Last week, my friend’s grandpa told me to copy some songs from his CDs to his iPod. And, within the wink of an eye, I made it for him.
However, you cannot directly import songs from the CDs to your iPod or iPhone. So, you have to take the help of a computer, and go through a couple of child’s steps. That’s it.
Do you still have a massive collection of CDs and want to have those songs on your iPod?
Yeah. You are at the perfect place to go. As a tech enthusiast, I know several hacks; moreover, I made profound research to gear myself up for it. So, let’s get the ball rolling.
Please, keep reading. Do not skip any portion if you want all your doubts to vanish.
How to Transfer Songs from CDs to iPod
Where there are Spotify, SoundCloud, YouTube Music, and thousands of other gigantic music libraries available, the usage of CDs has literally become obsolete. Singers and bands are now even releasing their albums or tracks on the platforms I mentioned above.
Still, I would evidently say emotions and class are quite entwined with CDs that are to an extent missing in the state-of-the-art applications and libraries. Up to now, a significant portion of the aged population is driven by CD songs; they are not willing to let anything replace it. Therefore, though Spotify, etc., are the fresh crafts in this genre, they are still not the perfect alternative to CDs.
Keeping these feelings in mind, I tried to gather almost all possible way-outs within a single guide. In most cases, you have to use iTunes to import and process the tracks before putting them into Apple iPod or iPhone. I will also show techniques to bypass iTunes to get the job done. So, let’s have a dive into the detail.
Here are the methods to transfer songs from CD to iPod or iPhone:
1. Import CDs with iTunes
iTunes is a built-in music library for Apple users. Apple Music is also doing great. iTunes is managed by extensive virtual storage that syncs tracks in all the devices you are currently logged in. So, this is the most convenient way of transferring songs from CD to iPod.
Here are the steps to rip a CD with iTunes:
- Go ahead and open up iTunes on your computer. If you cannot find it on your desktop, you can search it on your Start menu. Just type iTunes there and click on the iTunes application from the suggestions that appear.
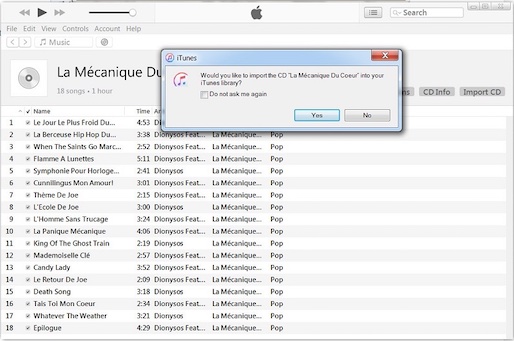
- Insert your CD into your computer. Once the CD is loaded, iTunes will ask you if you want to import the entire CD.
- Click on Yes if you want to import all the tracks available on the CD. Choose the option No if you’re going to import songs selectively. Here, I am clicking on No.
- Make sure you see all the songs are selected. Just simple uncheck the songs that you do not want to import in.
- Hit the Import CD You will get it at the upper-right corner of the iTunes window.
- Leave the options however they are. Just for your information, I would like to say there are 2 typical file formats with iOS devices- MP3 and AAC. So, if AAC is already selected, it is okay. If not, click on the down arrow to unwrap the options, and select the MP3 encoder in the Import Using
- Click on OK to confirm. It will start importing the songs, and you will see a slider at the top. There you can find an estimated time of how much is left to complete the import.
- Go back to your songs library. At the top, you will get a music icon just under the File tab. Now, click on that.
- Search the songs by putting the title in the search box or scrolling down manually. If you get the songs you just put in, you have successfully imported the songs to your iTunes library.
- Create a playlist by simply clicking on the Playlists tab at the top-middle.
- Hit the Plus icon at the bottom-left corner, and a new playlist will be formed.
- Rename the playlist. Now, a folder has been created to let the import to iPod. Anytime you add another CD into iTunes, you can put it in this playlist or continue to make new playlists every time you put a CD in so that each playlist can represent a different CD.
- Tap on the My Music tab at the top.
- Find the songs that you wanted to put on your iPod.
- Click and drag the tracks to the playlist on the left you just created.
- Eject the CD from your computer and plug the iPod in. No need to close the iTunes application. Once iPod is connected, you will see the mini iPod logo under the menu bar. Click on that.
- Navigate to the Music under the Settings section. You will have your old playlist, Entire Library in MP3 and the new playlist consisting of the songs on your CD.
- Select both the playlists and click on Apply.
- Wait until the syncing is not over.
Now, eject your iPod from the computer, and you are ready to listen to the CD’s songs on your iPod. This is how you can import a CD into iTunes and put it on your Apple devices.
2. Sync CD music automatically to iPod with iTunes
This method to import music to your iPod is somewhat similar to the previous method. But, there, you have to do the syncing manually, and here the tracks will be synchronised automatically. Let’s get into this.
Here are the steps to sync CDs to iPod with iTunes:
- Plugin your iPod or iPhone into your computer.
- Start iTunes application.
- Tap on the iPod icon at the upper left of the iTunes window, just below the menu bar. You will get the Summary screen for your iPod visible before you.
- Navigate to the Music It is under the Settings section from the left pane.
- Check the Sync Music
- Select the Selected playlists, artists, albums, and genres.

- Make sure you checked the playlist you just copied from the CD.
- Hit the Sync
The tracks you got from the CD are automatically imported or synced to your iPod or iPhone. So, let’s enjoy!
What to Do If Imported Songs Do Not Sound Right
It may happen that the songs from the CD do not sound perfect as they were on CD after being synced and imported to your iPod. Many reasons may work behind this, but most possibly, this occurs if the CD is not read correctly.
However, you can go through these steps to solve your issues. The steps are in the followings:
- Open the iTunes application on your PC.
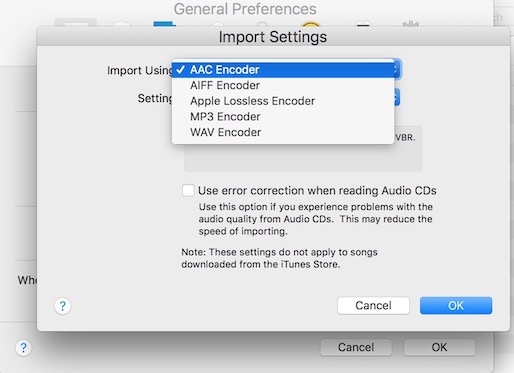
- Go to Edit and then Preferences.
- Click on General.
- Tap on Import Settings.
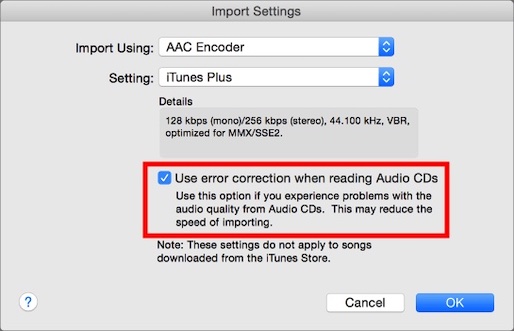
- Select the Use error correction when reading Audio CDs.
- Insert the CD now and import the tracks following one of the above methods.
Hope, the problem will be settled down.
Conclusion
I used iTunes as the CD ripper in all the methods I stated above. Undoubtedly, it is the best CD ripper software for Apple devices. Try not to use any third-party application as a substitute for iTunes. In Windows, you can also use Windows Media Player for this purpose.
Was this article helpful? If you feel it’s conducive, please share it with your peers.