Android is a fantastic mobile operating system with adaptable, quick, and chock-full features. Also, as an open-source operating system, you can show your creativity by making unique apps.
However, testing those Android apps can be a hassle. To minimize this nuisance, Virtual Box comes into play. You can freely test applications you made or just meddle with Android’s internals with Virtual Box.
All you need to do is install the Android ISO on a VM using VirtualBox.
But how to do it easily?
Being a Virtual Box user for the last 8 years, I’ve found the quickest way to install it through trial and error. So read this article thoroughly, and you can install Android on Virtual Box using simple 5 steps.
Do not skip any steps, or you can face errors during installation!!
Overview of Virtual Box
Virtual Box is a cross-platform software where you can use different types of operating systems in a single hardware. By using it, you can split a single system into different independent environments.
Virtual Box works as a hypervisor and creates a Virtual Machine (VM) where you can install different types of OS. Those OS are operational and work fine as you can run apps that are associated with those OS.
You can specify how many CPU cores, RAM, and disk space will be allocated to the VM while configuring it. This feature lets you run Virtual Box on a low-end PC.
The VB was first introduced in the market in 2007 by Innotek GmbH. After some time, the company purchased Sun Microsystems, and later, on January 27, 2010, oracle corporation took over the development of Virtual Box.
Here is the list of the supported operating systems:
- Windows 98 to Windows 10 build 10586
- Debian 3.1 to 8.0
- SUSE 9/10.0
- openSUSE 10.3 to 11.3
- Mandriva 2008, 2009,2009.1
- Fedora Core 1/4/5/6
- Fedora 7-23
- Oracle Linux 4 to 8
- Solaris 10 5.08 and later
- Mac OS X Server (Leopard, Snow Leopard)
- Android-x86, x64, x32
How to Install Android on VirtualBox
Android is an adaptable operating system for phones. You can test apps for mobile devices on your PC by installing Android ISO to VirtualBox. Before starting, you need to download the Android x86 ISO.
Here are the steps to install Android on VirtualBox:
1. Launch the Virtual Box
Installing the Virtual Box is the first step to using Android on your PC and configuring the VM. After that, the actual work starts. Follow the step below to complete the prep work.
Here are the steps to installing Virtual Box and Launching the VM:
- Go to the VirtualBox and download Virtual Box
- Follow the installation instructions.
- Download Android ISO from android-download. Android-x86 project is a reliable source for downloading Android ISO.
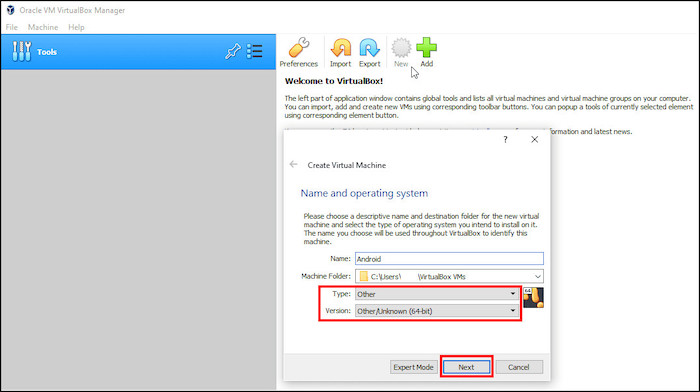
- Open the VirtualBox and click New.
- Select Android in name, Other in the type, and Other/Unknown(64-bit) in the version(32-bit for 32bit Android iso). [selecting other will remove some compatibility issues]
- Click Next.
Now the prep work is done. Follow the below to configure the Virtual machine.
2. Configue Virtual Machine
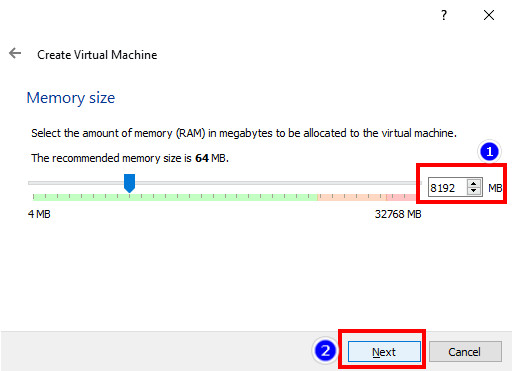
This step is mainly about allocating storage, RAM, and disk usage. After you press next, a memory allocation window will pop up. From there, you will allocate storage, RAM, and disk in MB.
Here are the steps to Configuring a Virtual Machine:
- Select 8GB of RAM in the memory size menu.
- Click Next.
- Select Create to start building your virtual machine.
- Choose VDI for hard disk type.
- Click Next, and set the file to Fixed Size.
- Set the amount to 16GB in the file location and size.
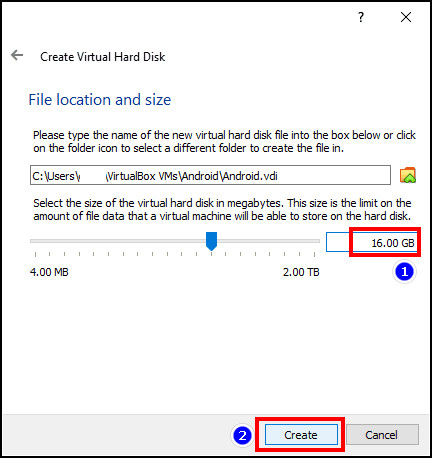
- Select create.
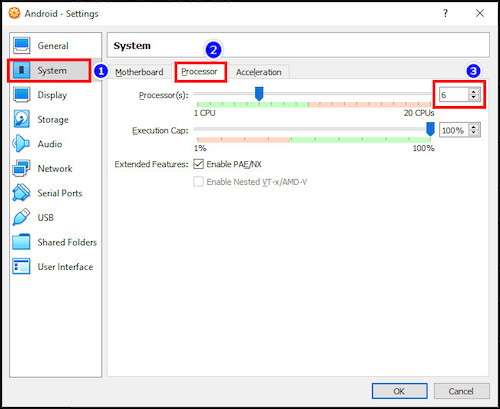
- Right-click the VM and click settings.
- Go to In the System > Processor.
- Select at least 2 cores.
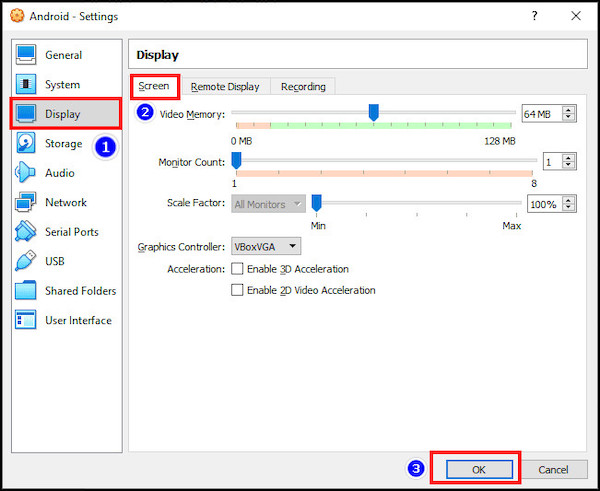
- Navigate to Display >Screen.
- Choose VBoxVGA for Graphics Controller.
Quick facts:
- The maximum number of RAM you can allocate is based on your computer’s system resources.
- Android-x86 needs at least 8GB to operate normally.
- Only assigning one virtual CPU core to the VM will crash the system.
Now the VM you created will show in the Virtual Box, and you can use it for uploading the Android ISO file.
3. Select Android disk image file
After configuring the VM, the next step is to upload the Android ISO file you downloaded. Follow these steps to select the ISO.
Here are the steps to select the Android disk image file:
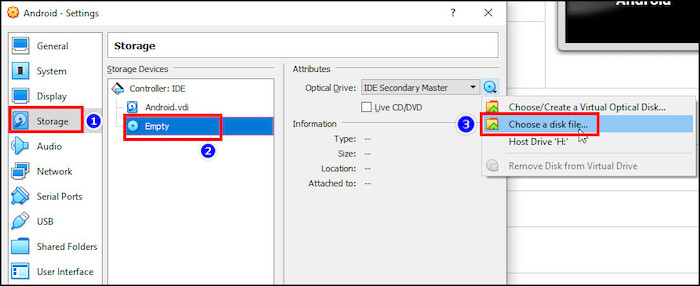
- Left click on Storage.
- Choose the Empty.
- Tap the DVD icon.
- Select Choose a disk file.
- Pick the Android IOS and hit OK.
This will update the VM settings so that after launching the VM in VirtualBox, you can operate Android OS.
4. Launch the VM
After completing the previous steps, you are ready to run the VM. Select the VM and press start. If Select a start-up disk appears, choose the Android ISO. Scroll down to the Installation option and click it.
I’ve some quick tips for you for the problems you may face:
- If your Mouse and Keyboard stop working, click the Host key, and it will reappear again.
- In the Create/Modify partitions option, choose suggested default values.
- Use ext4 for installing Android to your new partition.
- Select yes when boot loader GRUB appears.
- If the GPT to MBR window appears, select yes.
- In the “/system” directory to be “read-write prompt, select Yes.
5. Initiatiate Android
Now android is installed, and you can launch it from the VM. A menu will appear when you open the VM; if you want to “Launch Android” or to reboot (the VM), select “Launch Android,” and your Android VM will come to life.
Now you can use your android setup however you would like.
FAQ
Can I install Android x86 on VirtualBox?
You can install Android-x86 as a VM using any QEMU or x86-based hypervisor.
Can you root a virtual machine?
Yes, you can root the VM you created in VMOS without affecting the primary system.
Is VMOS rooted?
Yes, VMOS is rooted. Users can use the guest Android VM as a rooted Android OS.
Can I run an Android emulator on VMware?
Yes. Fortunately, you can run the Android emulator on VMware Workstation, VMware Player, ESXi, and VirtualBox.
Conclusion
In short, to install Android on Virtual Box, you need to follow simple 5 steps. First, download and install Virtual Box, then configure the VM. After that, configure the Android ISO file, launch the virtual memory, and you are ready to use android on your pc.
Thank you for reading this article. I’m sure you can install Android on Virtual Box by yourself. Comment if any complications arise during installations. God bless you.