Windows can get bogged down by temporary files (a.k.a. cache files) generated by the applications that are installed. The result is slower app opening times and reduced responsiveness of the computer.
Just as you would clean the internals of your computer every few months, Windows requires its own maintenance check too.
So, follow me as I show you how you can delete the cache files and regain your PC’s speed.
Can you Clear the CPU Cache?
No, you cannot clear the cache memory of your CPU by yourself. It is built within the CPU and cannot be accessed. Only the CPU uses it to store the data needed for calculations when executing instructions.
You can only clear a CPU cache by powering off the computer. Cache memory is volatile in nature, similar to computer memory/RAM. When you remove the power source, all data stored in it is lost.
Now you might ask why to discuss about processors and cache memory here. Because you can confuse cache memory with cache files on a computer. Let’s clarify that.
CPU Cache Memory vs Temporary Cache Files
Cache memory is your CPU’s own storage space. Fetching data from the memory can introduce latency. So, it fetches data from the memory into here. Then the processor can access the cache any time it wants. CPU’s cache is divided into three levels, L1, L2, and L3.
Adequate size of CPU cache is needed for running game and other productivity application properly. It helps in execution and can save fraction of time in each task.
Temporary files on the other hand as also referred to as app cache or temp files. As the name suggests, these are files created by applications such as Google Chrome or Steam. These files remain stored on your computer’s internal disk drive, mainly in the primary operating system partition.
With time temporary files can accumulate and become very large. This is when the slowdowns start to happen. You get low disk space warnings and Windows takes time doing simple kinds of stuff.
Also, there are differences between the cache memory and register, and reading our article will help you differentiate. That clears things up right? So let’s shift our focus now to how you can remove the cache files.
How to Clear the Cache Files on Windows 10
Temporary files can reside in different places on your computer. While there are third-party tools that clean everything at once, I will focus on the built-in tools that Windows provides.
You can clear the cache files using Disk Cleanup. For cleaning the browser cache, you can jump into its settings and delete it there. The modern Windows apps from the app store have separate cache files and they can be cleaned from Windows Settings.
For your convenience, I have laid out the detailed steps and the screenshot for the individual apps below.
Follow the steps to clear the temporary cache files on Windows 10:
Run Disk Cleanup
Disk Cleanup comes preinstalled with Windows. You can choose which files to remove by selecting them. You can also delete the Windows updates files that remain on your computer after the installation finishes. It can free up a lot of disk space.
These steps will allow you to delete the cache file using Disk Cleanup:
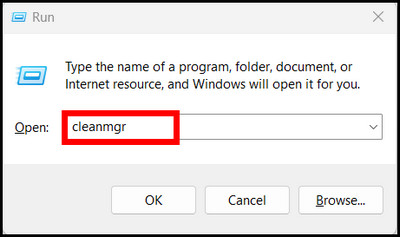
- Press Win + R, type cleanmgr, and press Ok. You can also search for Disk Cleanup from the Start Menu and launch it.
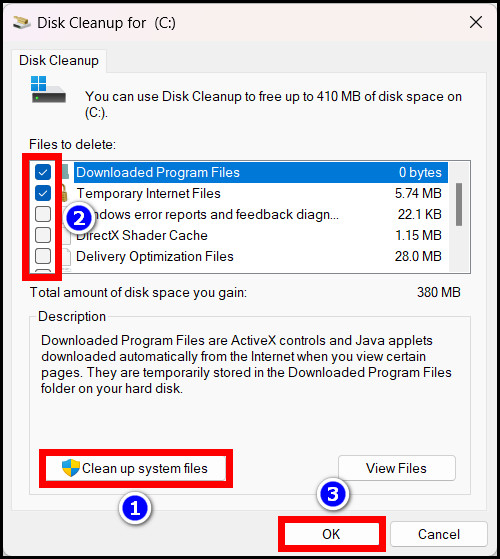
- Press on Clean System Files. Then select which files you want to remove by ticking the checkboxes.
- Click on Ok.
You can see a progress bar now. After all the temporary files are removed, the app should close automatically.
Clear the RAM cache on your computer and run more applications at once. Read our separate article where we explore this.
Your browser can accumulate a lot of data on the primary partition. These typically include cookies, images, and website cache data. These files are used to speed up your browsing if you browse the same website again in the future.
Deleting browsing data is totally safe. Your browser will download the same files in the future again, so that is not an issue.
Every browser has settings to clear the cache memory. I have shown the steps for Google Chrome and Mozilla Firefox as these are used most commonly.
Delete Google Chrome Cache
Follow the steps to delete the browser cache for Google Chrome:
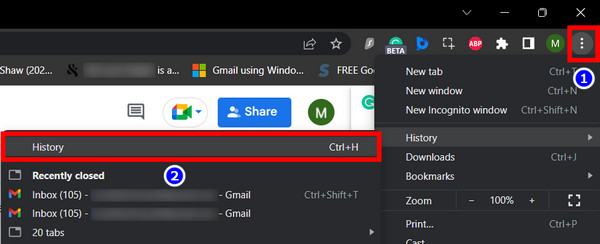
- Click on the More Options (three-dot) menu and go to History. You can also use the shortcut Ctrl + H.
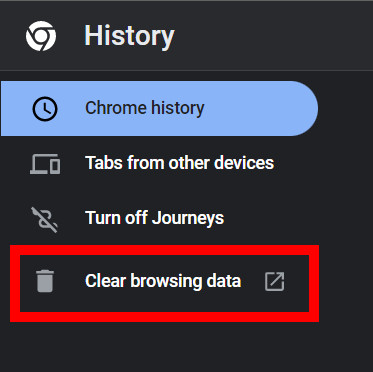
- Press Clear Browsing Data.
- Tick all the boxes and press Clear data.
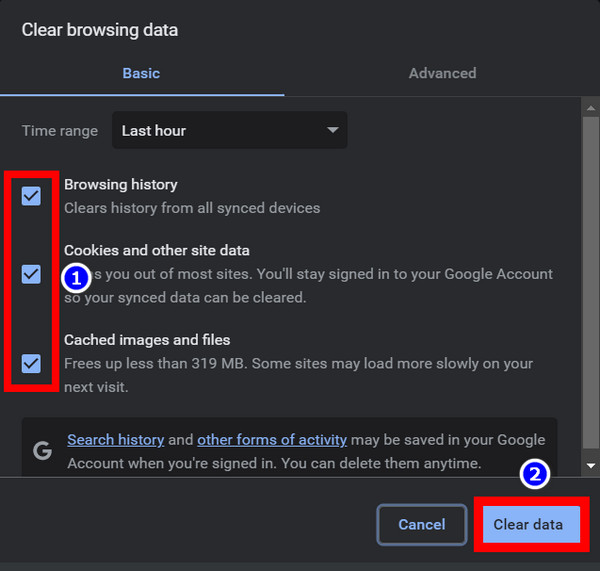
Google Chrome is cleaned when the process finishes.
Delete Firefox Cache
Here are the steps to delete the browser cache on Firefox:
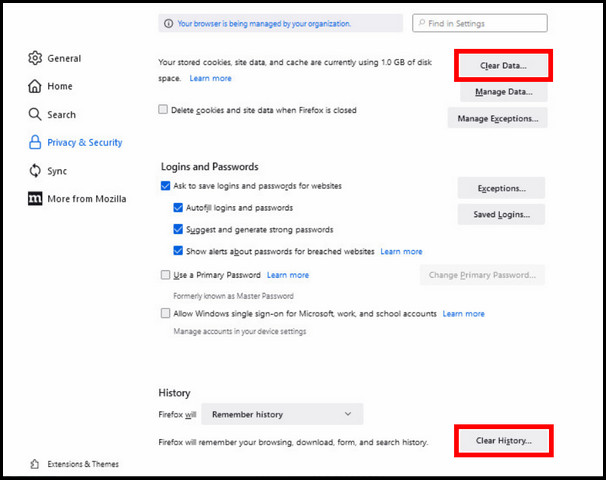
- Click the gear icon to go to Settings. You can also press More Options > Settings.

- Press the Clear Data and Clear History Select the data you want to remove from the pop-up box and press Ok.
This will remove all the Firefox cache from your computer.
If Firefox uses too much CPU on your computer, surely check out our separate article where we troubleshoot this issue.
Remove Windows Temporary Files
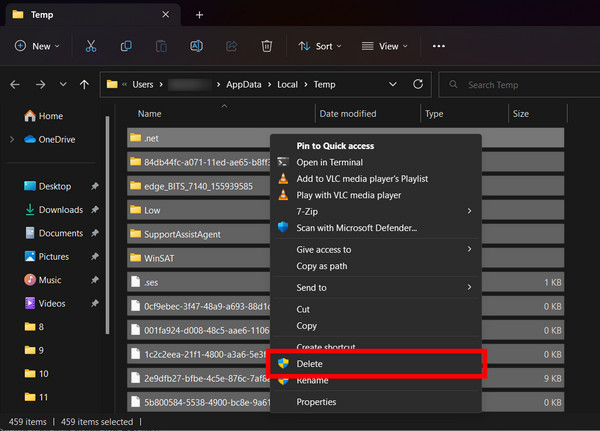
You can manually remove the temporary files too. That way, you would see how much of this stuff collects on the primary drive. Sometimes Windows can warn that a certain file is used by a process, just skip that and proceed to delete the rest of the files.
Follow the steps to delete temporary files on Windows:
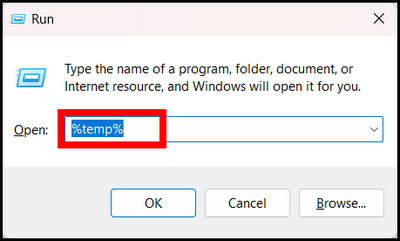
- Press Win + R, type in %temp%, and press Ok.
- Select all the files and press the Del key.
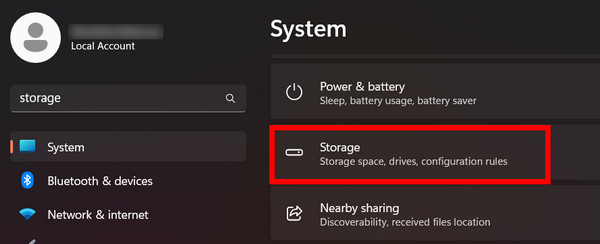
Now, Windows Settings also allows you to remove temporary data. Let’s remove those now.
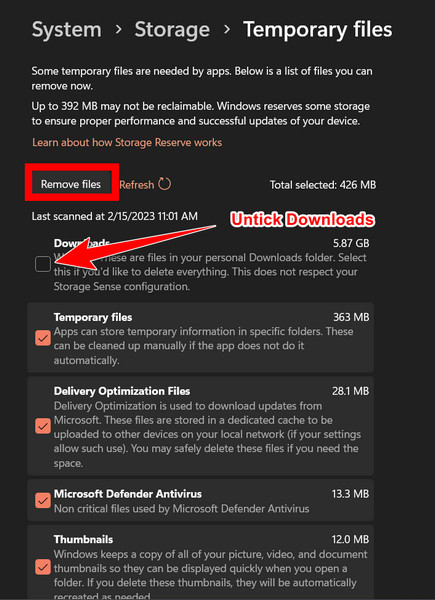
These steps will remove the temporary files using Windows Settings:
- Open Settings and go to Storage.
- Click Temporary Files. Wait for the app to calculate the freeable storage space.
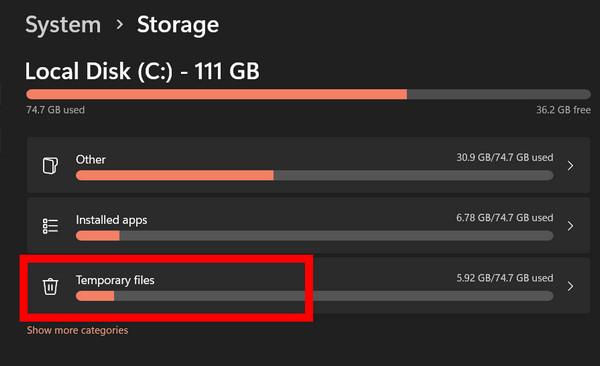
- Remove the tick from the Downloads folder. Check all the rest of the boxes.
- When you are sure which files need to be removed, click the Remove files button.
You just removed a whole lot of unused data files.
Are app icons appearing fuzzy on Windows 11? Make them clearer by following our guide where we rebuild the icon cache on Windows 11.
Delete Microsoft Store Cache
You can also remove the cache files produced by Microsoft Store. It is quite simple and you just need to insert a simple code.
These are the steps to delete the Microsoft Store cache:
- Press Win + R, type wsreset.exe, and press Ok.
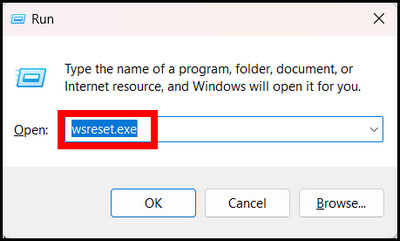
- Wait for the command line tool to finish cleaning up. The window should close automatically.
Relaunch the Microsoft Store app. It should start quicker now. Additionally, you can check out our another article to clear the Microsoft cache credentials.
Flush DNS Cache
Similar to a cache file, the DNS (Domain Name Service) cache helps Windows for faster retrieval of an IP Address when an app requests a connection to a server. If the address exists, the connection is made quickly using the cache. But as with any cache files, they can become troublesome when too much data starts to gather in a place.
In that case, flushing the DNS (as they call it) is ideal for your computer.
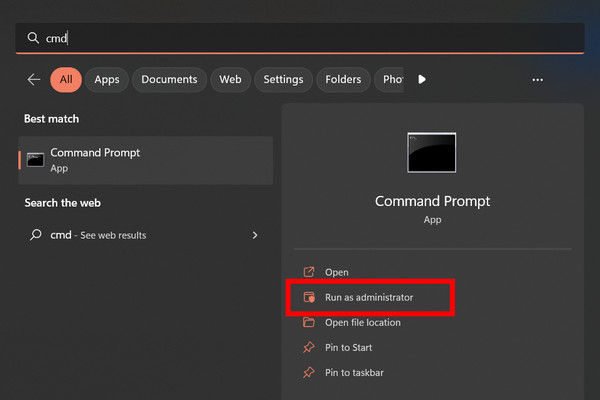
Here are the steps to flush the DNS on Windows 10/11:
- Type cmd on the Start Menu and click on Run as Administrator.
- Now type ipconfig/flushDNS and press Enter.
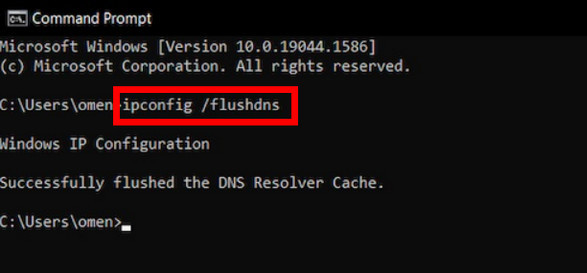
The Command Prompt will inform you when this is completed.
Frequently Asked Questions
How do I clear my CPU cache memory?
You cannot clear the CPU cache memory normally. It can only be accessed by the processor and is hence unusable by a user. To clear it, you have to reboot your computer.
Is it safe to clear the PC cache?
Yes, you can safely delete Windows cache files. It does not harm its functionality but rather gives you a nice speed boost.
Does clear cache delete everything?
Not at all. It only deletes the temporary files generated by the applications. All your existing applications and files in the drives stay safe.
Maintenance Done!
Well, you did a fine job there. Now Windows should feel faster than before. No trickery is done here. Just some good old maintenance.
Remember to keep your Windows installation tidy and delete the cache files every few months. And do stay away from the apps that promise you optimizations and free performances. All you will get is loads of viruses and malware.
That’s all for today. Enjoy your computer’s newfound agility.
Cheers!