Chromebooks are great at doing the work Google intended them to do. Browse the web, watch videos on Youtube, or edit documents on Google Docs. Also, Android app support means you can play supported games such as Roblox.
But if you want to run an application that requires Windows, you cannot do that. Or at least that’s what Google states. But can you really?
Yes, you can run Windows on your Chromebook or even install it natively. To know how to do this, jump right into this article.
How to Get Windows on Chromebook
The easiest way to get Windows on Chromebook is by running it as a remote desktop. If that’s not enough, you can install it as a virtual machine.
But installing Windows has some caveats.
Recent Chromebook with Intel Core i3 or higher and AMD 5000 series processors will not break a sweat when running Windows. The problem arises when you install it on old Chromebooks released 3-5 years ago.
Windows requires you to have a Chromebook that has at least 30 GB of storage. Older models having 16 GB is not going to cut it.
If your Chromebook comes with removable storage, then you can swap out the old drive and install a higher-capacity SSD there. But most Chromebooks do not have that luxury and have the RAM and flash storage soldered into their motherboard. This means if you want to install Windows, you need to install it on the meager internal storage.
Also, 4 GB RAM is a bare minimum requirement. You will experience stutters if installed on anything less.
Before diving deeper into that process, let’s see the easiest way to access Windows.
Here is our easy guide for how to Copy and Paste on Chromebook?
1. Run Windows Remotely
A remote desktop allows you to access your PC over the internet on a different device.
Imagine this scenario. You have a beefy desktop running the latest RTX GPU. You want to enjoy the games in the comfort of your couch. That is when you can use a remote desktop to access that PC from your Chromebook.
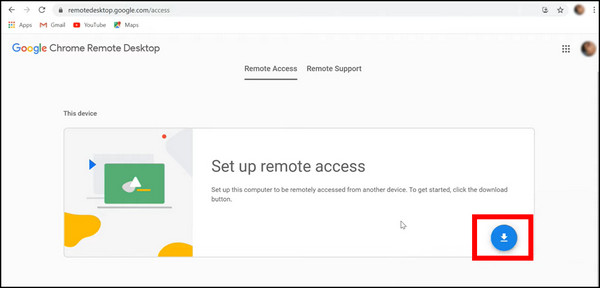
Google provides a Chrome Remote Desktop extension that allows you to do this. Remember, the extension needs to be installed on both computers, and the remote PC must be powered on. You can expect some latency as you access the other PC. But the experience depends on the speed of your internet connection.
Here are the steps to access Windows remotely on a Chromebook:
- Open Chrome on your Windows PC.
- Go to Remote Desktop and download the app. This opens up the extension page.
- Click Add to Chrome.
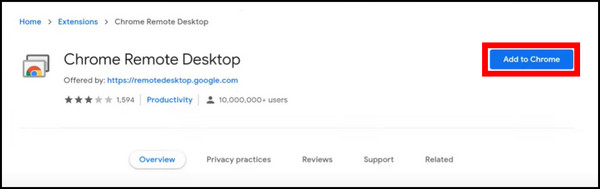
- Next, click on Add extension. It will be installed shortly.
- Go back to the Remote Desktop webpage you opened earlier.
- Click Accept & Install.
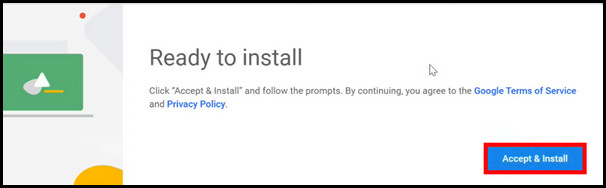
- Follow the on-screen prompts and complete the installation.
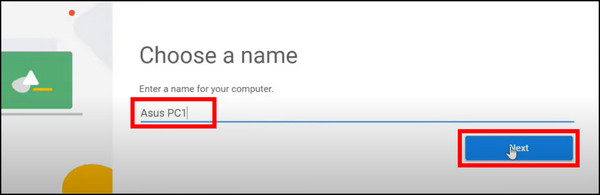
- Enter a name for your Remote Desktop and press Next.
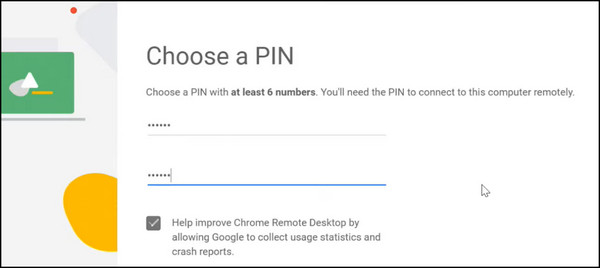
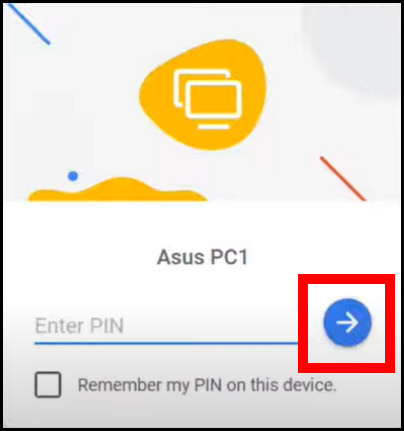
- Provide a 6-digit PIN. Once entered, press the Start button. Remember the PIN, as it will be needed when you access it.
- Open the Remote Desktop webpage from a Chromebook. Make sure you are signed in using the same email address.
- Scroll down and find the PC you set up remotely earlier.
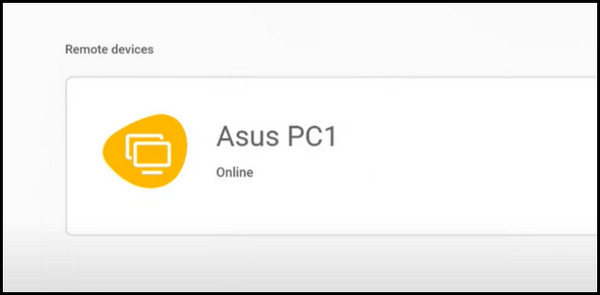
- Click on it and enter the PIN that you set earlier.
- Click the Start button with the arrow icon.
You will be right on the desktop of your other PC. Try moving the mouse and keyboard, and it should work. If the Remote Desktop window is small, you can change its size to fit the available screen space.
Technically you are running Windows, but it is mirrored to your Chromebook. The latency you experience when moving the cursor is connected to your internet speed. If you do not like the experience, you can install Windows on your Chromebook.
Here is another easy guide for how to access Microsoft Word on Chromebook?
2. Install Windows in a Virtual Environment
One other way is to install Windows as a virtual machine inside the Chrome OS. This method will use the command line, so you need to be comfortable using the Terminal.
This uses the Linux Kernel Virtual Machine (KVM). Not all Chromebooks come with it. So Windows will feel slow if you do not have it.
We will install Windows on the Chromebook in 3-steps. First, enable Linux on your Chromebook. Next, configure the VM app that will allow you to run Windows. Finally, install our desired operating system.
So, let’s begin.
Step 1. Enable Linux
Google introduced support for Linux apps within Chromebooks in 2018. Most Chromebooks released after this period should support it. By default, it is not enabled. You need to go inside Settings and enable it from there.
Follow these steps to enable Linux on Chromebook:
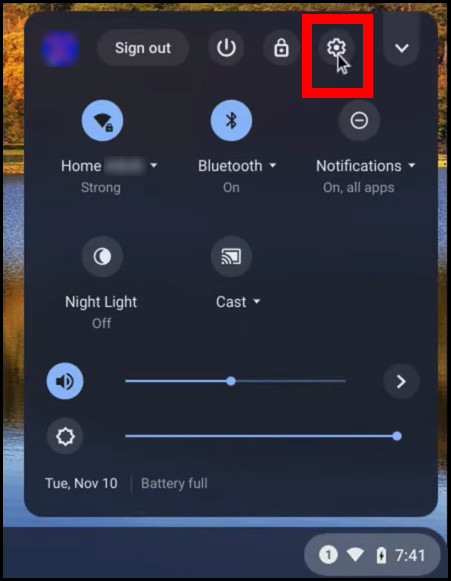
- Click the clock on the bottom right and open Settings.
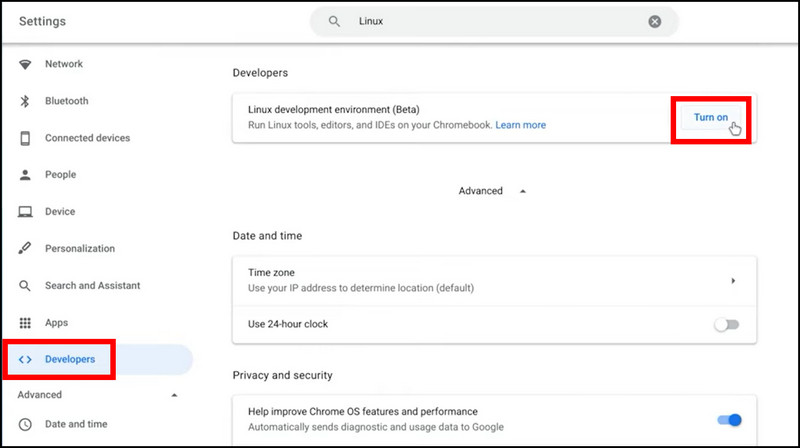
- Navigate to Developers and click Turn on near Linux Environment (Beta).
- Click the Next button in the new window that opens.
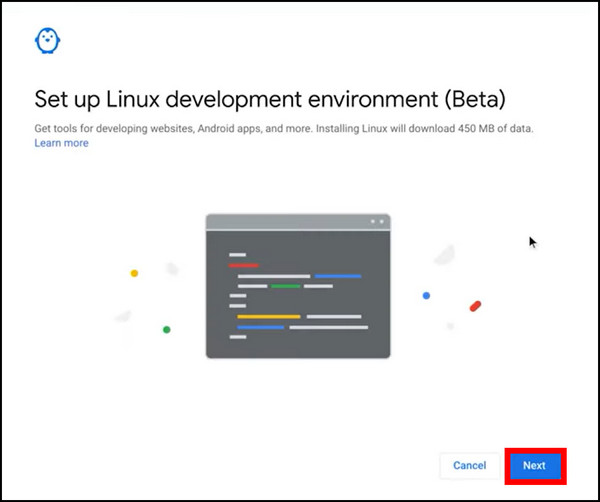
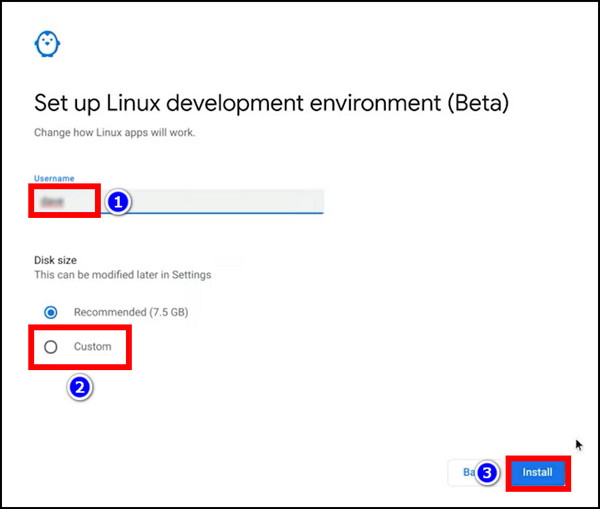
- Enter your Linux username. Under Disk Size, select Custom and set it to 30 GB.
- Click on Install.
The installer proceeds, and when completed, you have a working Linux system alongside your Chrome OS. Open Files, and you should see a new drive called Linux Files present. This directory contains everything that you just installed.
As a Linux user, I check the latest updates for the system every time I install a new application. It is a good practice everyone should develop. And that is what I did after enabling the Linux subsystem.
The code below will check all software repositories and update them.
Read our epic post about Split Screen on Chromebook.
Step 2. Install Linux KVM
We will use Virtual Machine Manager to run Windows. It will run the OS as a virtual machine from the Linux kernel.
There are other popular applications, such as Virtual Box. But Chromebooks already have low-end hardware, so it is better if you run something that uses hardware-based virtualization to reduce the load.
Here are the steps to enable Linux Virtual Machine Manager on your Chromebook:
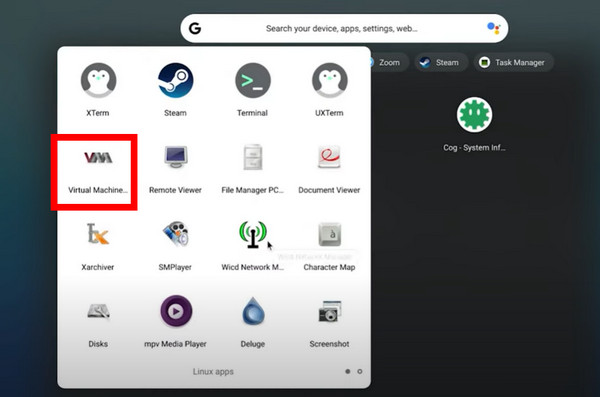
- Open Terminal from the list of installed applications. You can scroll from the Chrome OS taskbar or click the dock icon at the bottom left.
- Type the following code and press Enter.
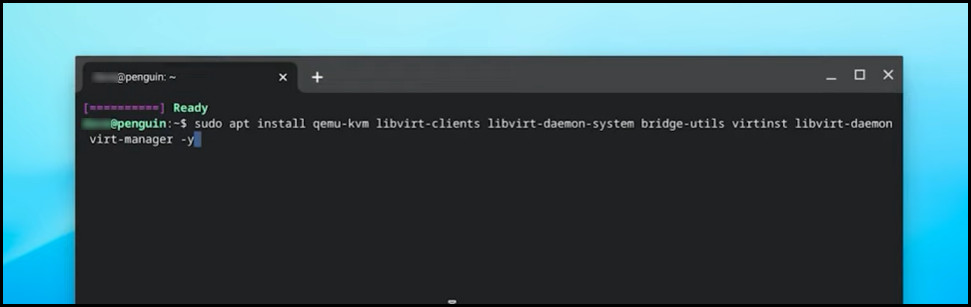
Wait for the package manager to get all the software dependencies and install them. You will see the VMM icon when the installation completes.
Follow our epic article for how to Inspect on Chromebook?
Step 3. Install Windows
Before installing Windows on your Chromebook, you need to get the disk image file also known as an ISO image. Download it from Microsoft’s website.
Now configure the VMM tool so that it can run Windows. You need to locate the ISO file and set the virtual system specifications (allocate RAM and CPU cores). The tool then sets up a virtual environment, and soon you will see the Windows boot icon.
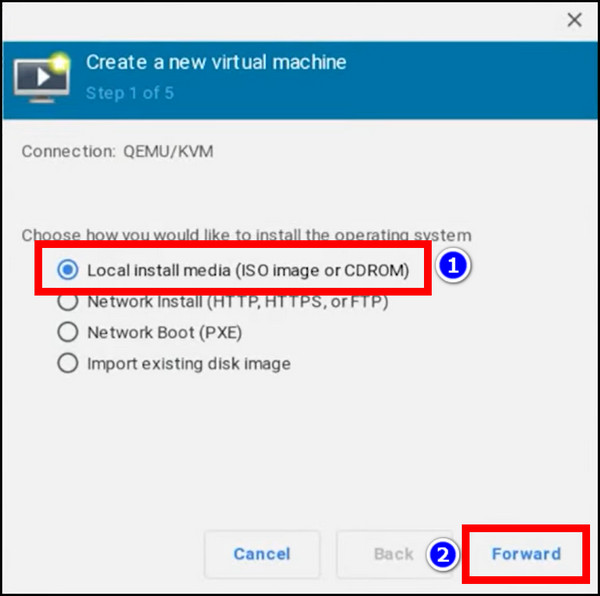
These are the steps to configure Virtual Machine Manager to run Windows:
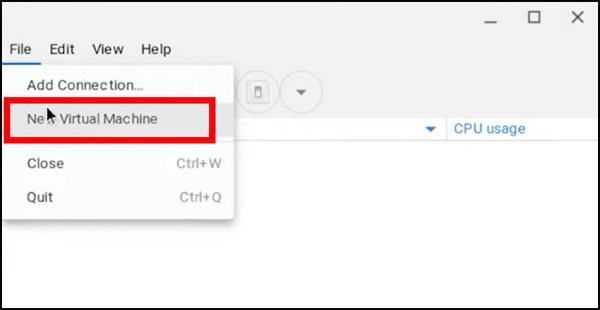
- Open Virtual Machine Manager.
- Click File > New Virtual Machine.
- Select Local install media, and press Forward.
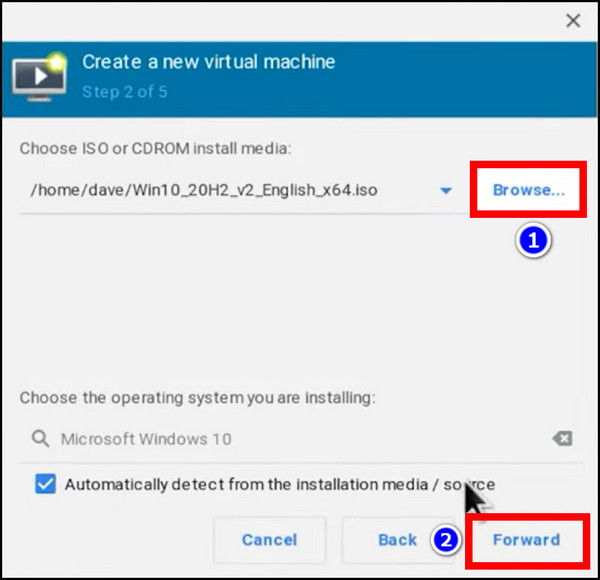
- Click Browse and select the Windows Disk Image file. You may need to click Browse and then click on the .iso file. Press the Forward button when done.
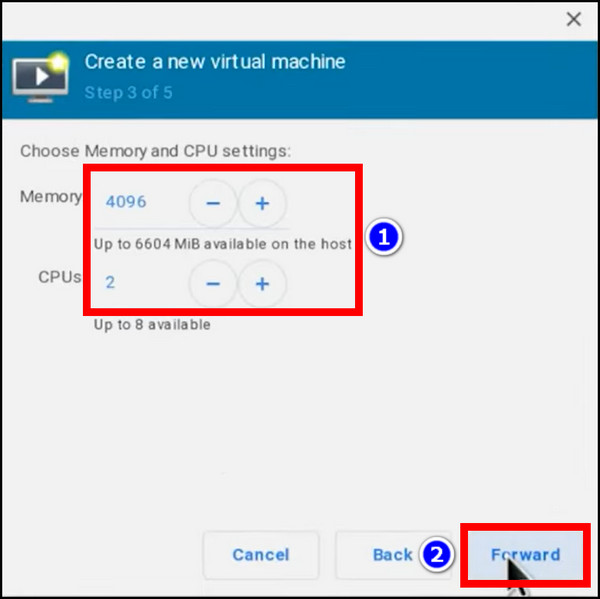
- Next, enter how much memory and CPU cores you wish to dedicate to this machine. My Chromebook has 8 GB memory, so I can allocate 4 GB here. I have also selected 2 cores as my CPU. When selected, click Forward.
- Finally, enter the Windows machine’s name. Click the Finish button. If the app prompts you to start a virtual network, select Yes.
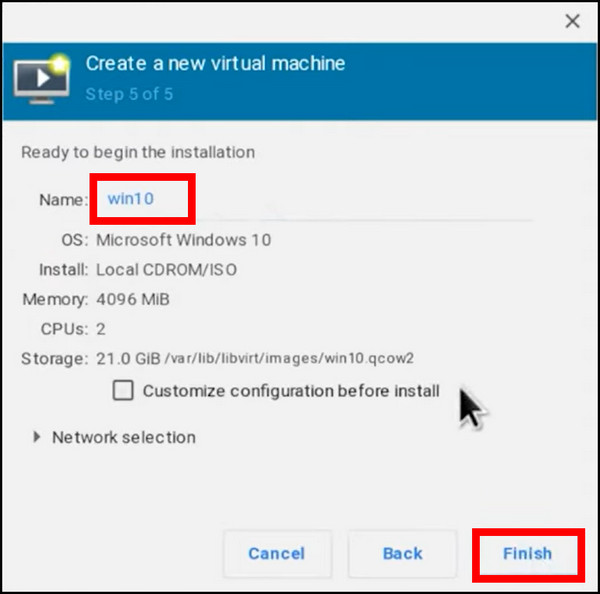
It took a few seconds on my Chromebook when the app was busy configuring the settings I had just provided. Then I saw the Windows icon. That means everything is proceeding smoothly.
The next steps are straightforward. If you have installed Windows before, these will not prove any difficult for you. Still, go through the steps below if you need them.
Here are the steps to install Windows on your Virtual Machine:
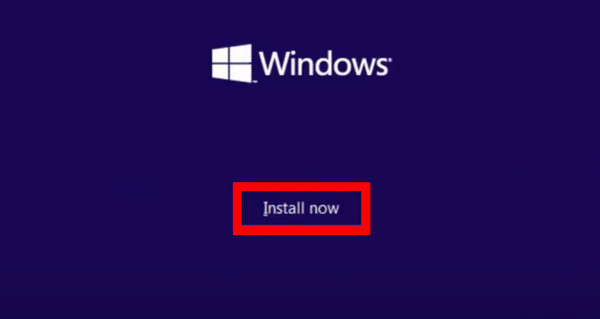
- Click Install Now on the Setup screen.
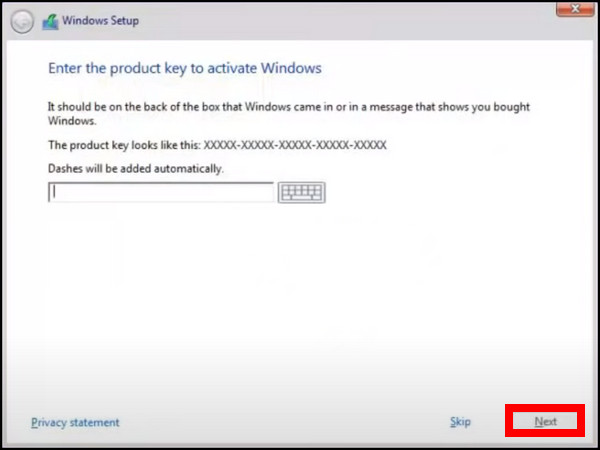
- Next, enter the product key. You can skip this step by clicking I don’t have a product key.
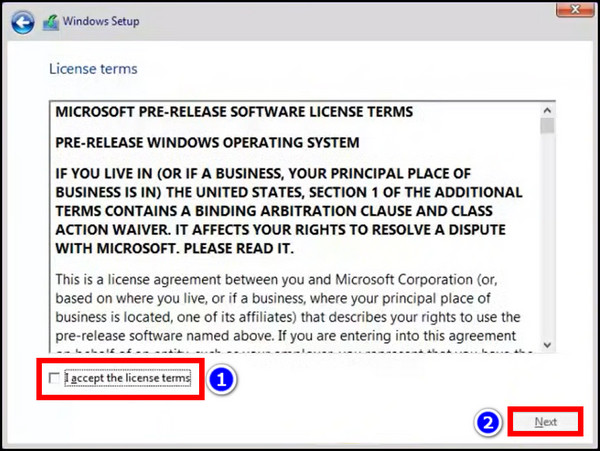
- Select the version of Windows. I went with Windows 10 Pro.
- Accept the license agreement and press Next.
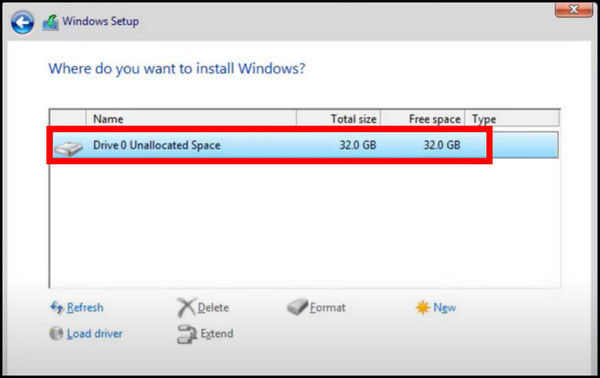
- Select the partition where you wish to install Windows. You will see the only partition that you just made in Linux a few steps ago. It will be selected by default. So, click Next.
The installation will take a few minutes. On newer Chromebooks with SSDs, it will take a considerably short time.
After you complete the initial setup, the desktop will load. Everything should work, including the sound and network connections.
Now Try installing Chrome here. It should be a nice joke, right? Running Chrome inside Chrome.
You can check our simple solution for Keyboard on Chromebook not working.
Frequently Asked Questions
Where to download Windows 10 for Chromebooks free?
You can install the regular Windows disk image file (.iso) to install it on a Chromebook. Download it from Microsoft’s download page.
Is it better to run Windows on a Chromebook or buy a Windows laptop?
Windows will run faster when running on a dedicated PC. If you install it on a Chromebook, expect to lose some performance as it will run over an operating system which slows it down.
Conclusion
Windows should be running on your Chromebook by now. As we have not installed it natively, you can switch back to Chrome OS by just shutting down the virtual machine.
I hope this article helps you out. Do comment if you face any problems during the installation process.
That’s all for today.
Goodbyes for now.