Are you facing any Windows 11 network issues? Do you frequently get slow download speeds on Windows 11? If so, this article is all you need to get your internet back to its normal behavior.
Why is my Internet slow on Windows 11?
I had a headache last week trying to figure out exactly what was causing my internet to become slow suddenly, so you are not alone in this. I was only successful in fixing my issue after going through more than a dozen guides and blogs.
This article only focuses on the fixes that I tested myself and confirmed to be working, so you won’t have to waste time like me. Just grab some caffeine and start reading.
How To Fix Slow Internet Windows 11?
It’s more efficient to find out where your slow internet issues are coming from and apply fixes related to that, in my opinion. To do that, you need to think about when you first came across this problem and whether you installed software or installed an update.
Another point is to do some basic troubleshooting before applying any fix. This could include checking the internet cables for damages, the router, or even contacting the ISP for information.
Here are the steps to fix slow internet Windows 11:
1. Reboot Your Computer
This may seem like a stupid fix right now, but trust me, you can fix half the problems out thereby performing a simple reboot.
It won’t solve every issue, but if there are some issues with the DNS cache or too many unnecessary services are using data, then restarting your PC will clean DNS cache and services and restore network settings.
Follow our guide to Fix Internet Disconnects When Downloading Large Files.
2. Enable Bandwidth Restrictions For Windows Updates
While it is essential to keep Windows up-to-date with the latest fixes and improvements, they also limit traffic for other apps.
Thankfully, Windows has provided a feature to adjust specific bandwidth for downloading updates.
Here are the steps to enable bandwidth restrictions for Windows updates:
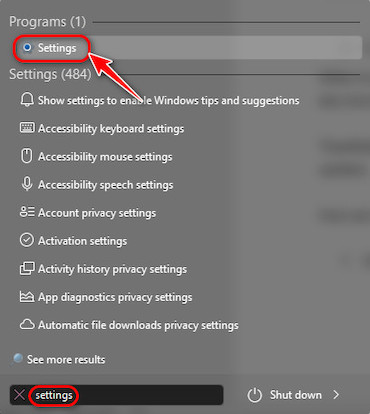
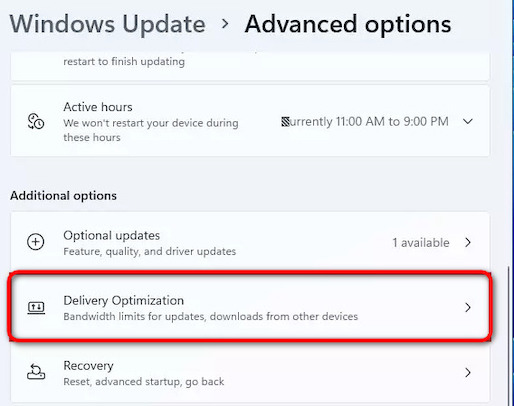
- Go to Start, type Settings, and launch the first result.
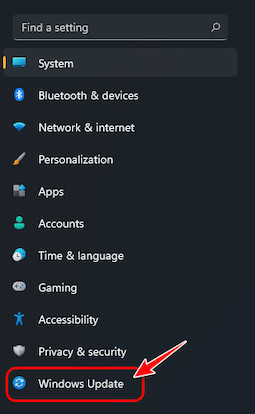
- Click on ‘Windows update’ from the left pane.
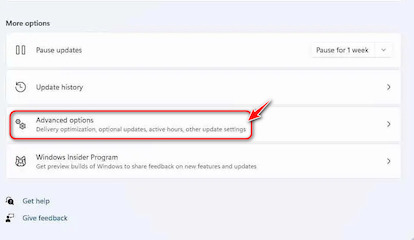
- Click on ‘Advanced options’ in the more options section on the right pane.
- Scroll down, find ‘Delivery optimization’ under Additional options and click on it.
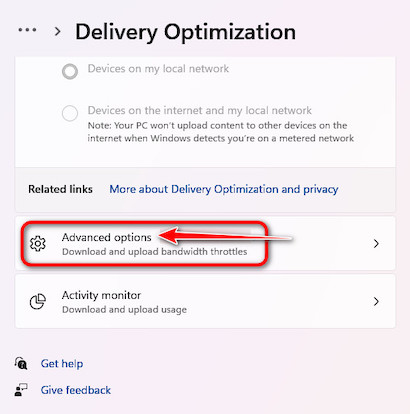
- Next, click on ‘Download and upload bandwidth throttles’.
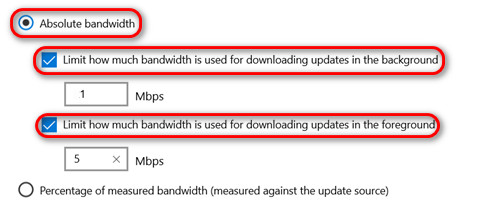
- After that, enable the Absolute bandwidth radio button to tick both the checkboxes under that. You can enter any value of your choice here, but I suggest 1Mbps for downloading and 5Mbps for uploading.
Check out the easiest way to fix Windows Can’t Access Network Drive On Windows 11.
3. Launch Internet Troubleshooters
Windows 11 comes with a massive stack of troubleshooters to fix minor issues related to the system, so why not put them to use?
You can launch internet troubleshooters by following these steps:
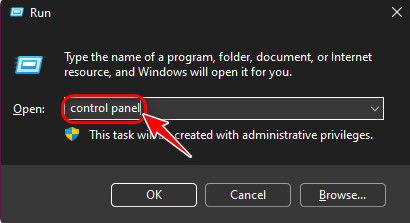
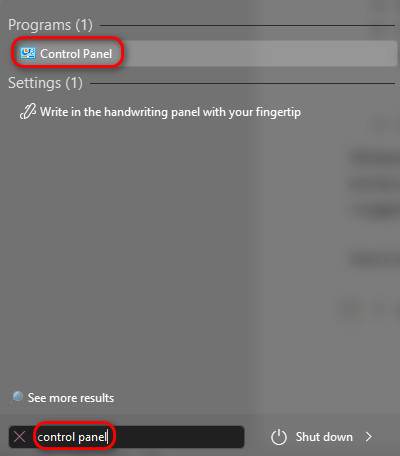
- Press the Windows and R key simultaneously to bring up the Run window and type Control panel, and hit enter.
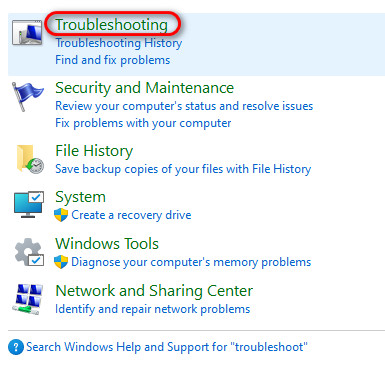
- Search ‘troubleshoot’ in the search box on the top right corner and hit enter.

- Click on the Troubleshooting option from the search results.
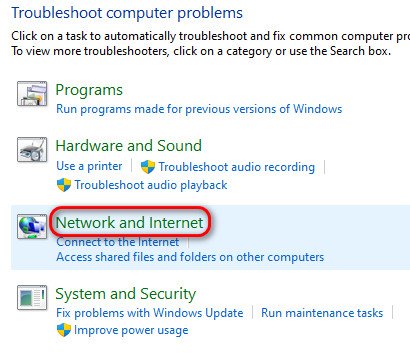
- Select ‘Network and Internet’ from the list of options on the next page.
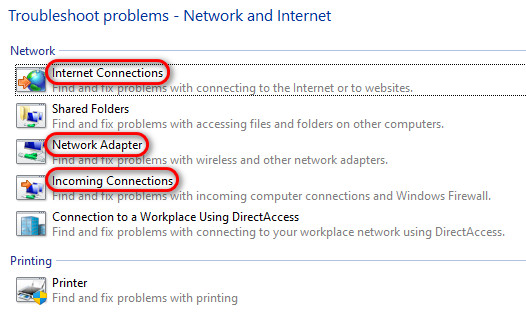
- Under the Network section, Run the Internet Connections, Network Adapter, and Incoming Connections troubleshooters one by one and follow the instructions.
4. Disable Windows Defender
Windows Defender is a superb tool created by Microsoft to tackle common viruses and malware, but this tool has also interfered with internet connections in the past. I suggest disabling this and using a third-party option like Norton for better internet speeds.
Here’s how you can disable Windows defender:
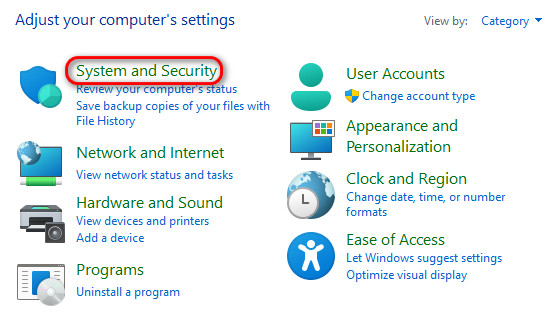
- Launch the Control panel by searching for it in the Start menu.
- Click on ‘System and Security’ once the Control panel loads.
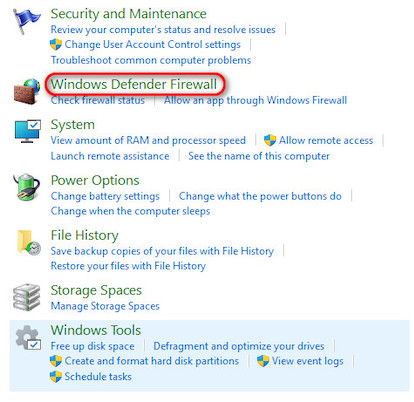
- Select ‘Windows Defender Firewall’ from the next page.
- Next, look for an option to ‘Turn Windows Defender Firewall on or off’ on the left pane.
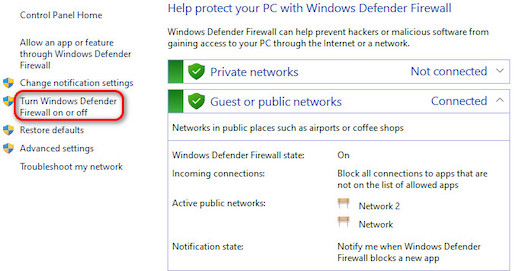
- Click on ‘Turn off Windows Defender Firewall’ under both Private and Public networks. After that, click on OK to save the changes.

5. Disable Metered Connections
Windows has a feature built-in that allows you to set a bandwidth limit for your connection. After your bandwidth reaches this limit, your internet connection will be limited or unusable for the month. If you don’t want to use this feature, simply disable it.
Here are the steps to disable metered connections:
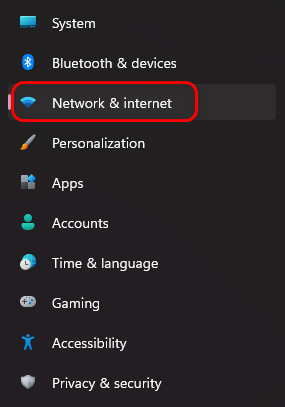
- Open up Windows settings by pressing Windows, and I key simultaneously.
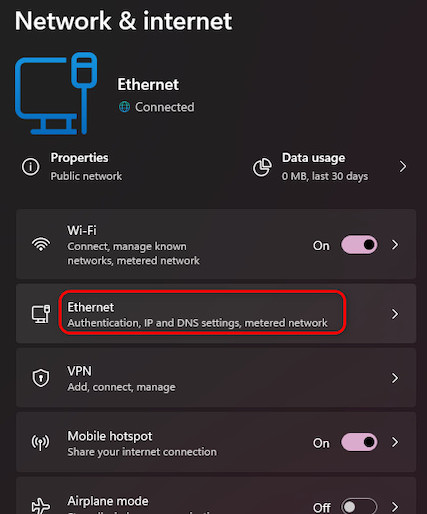
- From the left pane, switch to Network and Internet.
- Check which type of connection you are connected to and click on it. I’m connected to Ethernet, so I will click on Ethernet.
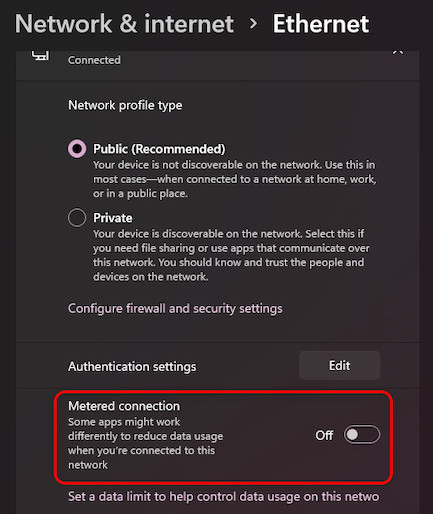
- Scroll a little until you find Metered Connection and turn off the toggle for it.
6. Switch To A Better DNS Server
DNS servers help your computer communicate with the internet, so switching to a more stable DNS server will surely boost internet speed.
The steps to switch to a better DNS server are as follows:
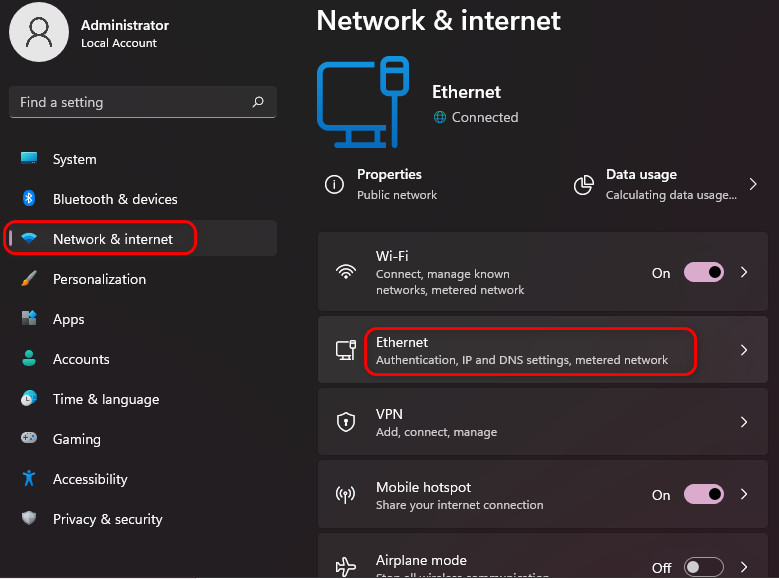
- Launch Windows settings app from one of the previous methods.
- Switch to the Network and Internet option on the left and click on your connection type on the right.
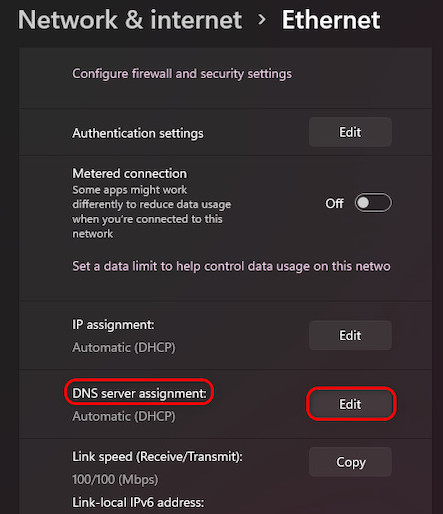
- Look for ‘DNS server assignment’ by scrolling and click on the Edit button next to it.
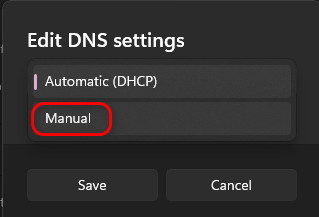
- On the Edit DNS settings window, expand the drop-down menu and switch to Manual.
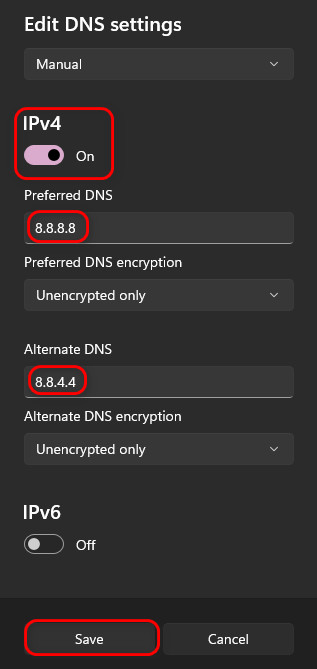
- Turn on the toggle for IPv4, and under Preferred DNS, type ‘8.8.8.8’. Similarly, under Alternate DNS, type ’8.8.4.4’. Finally, click on Save to save the settings.
7. Update Network Drivers
It’s essential to keep your network drivers up-to-date to prevent any unexpected problems from showing up and to ensure stability.
You can update network drivers by doing these steps:
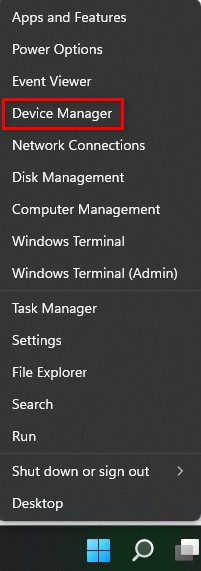
- Press the Windows and X key at the same time to open a context menu. Click on Device Manager from the list.
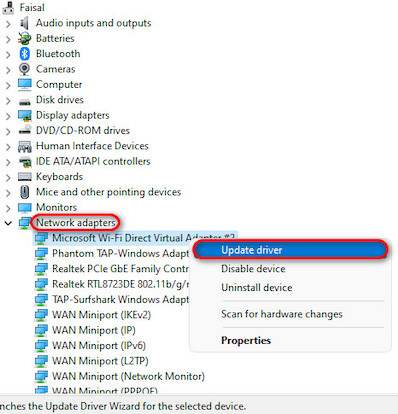
- Double-click on Network Adapters to expand it. Right-click on any Microsoft, Intel, or Realtek driver and select Update Driver.
- In the next window, click on Search Automatically for Drivers to find the latest drivers on the Internet and install them.
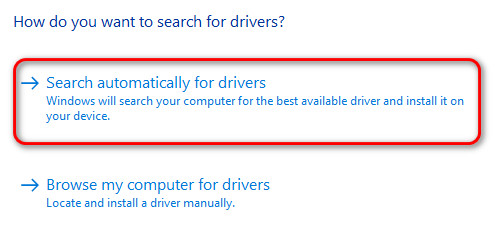
- Repeat the second step for every Microsoft, Intel, or Realtek driver you see in the list.
8. Restore Default Network Settings
If the previous methods were unsuccessful, your network settings were likely tampered with by a third-party program or service. Don’t worry, Windows has made it easy to reset those settings.
Here are the steps to restore default network settings:
- Launch Settings by pressing Windows and I at the same time.
- Switch to the Network and Internet tab from the left pane.
- You need to scroll down and select ‘Advanced network settings’ from the list of options.
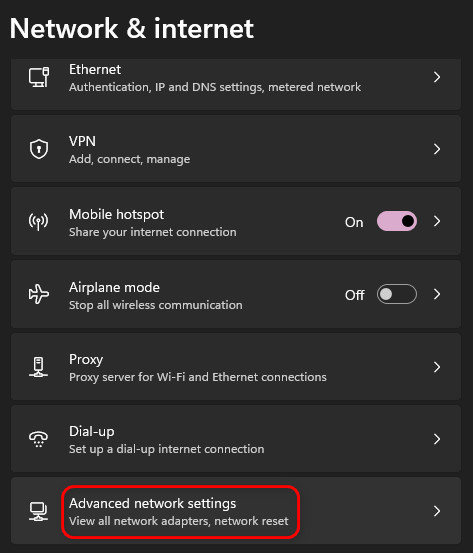
- Look for the Network Reset button in the More settings section under Advanced network settings.

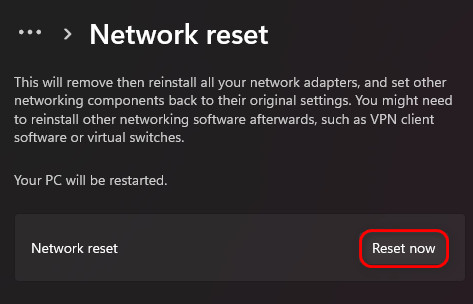
- Click on the Reset now button on the next page. After your PC restarts, the internet should be stable.
Check out the easiest way to Fix Slow Internet On One Computer But Fast On Another.
FAQ
Why is my computer slow after upgrading to Windows 11?
Your computer is slow after upgrading to Windows 11 because your hardware probably doesn’t fully support Windows 11. There might also be issues if your Hard disk runs out of sufficient storage after installing windows 11.
How do I check my WiFi speed on Windows 11?
You can check your WiFi speed on Windows 11 by going to Network and sharing center from the control panel and clicking on Change adapter settings on the left side. After that, double-click on your WiFi to launch a window where the speed information will be visible.
Why is my PC not getting full Internet speed?
Your PC is not getting full Internet speed because it is probably a victim of malware attacks or nasty spyware. You need to run a full scan from Windows defender to remove any viruses from any third-party programs.
Final Thoughts
The Internet has become so integrated into our lifestyle that a minor issue related to it can make us have a panic attack. Luckily, it doesn’t take much to solve internet issues if you follow my steps correctly.
Thank you for reading my article, and you know where to find us for any questions.