Are you trying to scale the steam VR area according to the available space of your room? Or calibrate the optimal measurement? Well, you are in the right place.
The calibration process can be challenging if you are new to Steam VR.
But, since you are reading this article that an expert VR user has written, you can eliminate the word ‘tough’. I have been using Steam VR since it was first invented and I know how to orient Steam VR in the proper manner.
Do you want to know more about the calibration process? Stop roaming around and read this article from top to bottom. Once you read the whole passage, I am sure all of your confusion will be cleared out.
Overview of Steam VR Calibration: Room Configuration
You need to measure several things when you are setting up a steam VR. The first one is room calibration. This is important because you need to set a parameter for your VR which will be marked as your play area.
If you fail to do so, you might encounter obstacles while playing a virtual reality game and you might get hurt.
The first time I brought a VR headset to my home, I intentionally didn’t calibrate the VR according to my room. Guess what did that occur! I managed to get a fracture on my hand, which I got from banging my hand with a table.
That wasn’t supposed to happen only if I measured the clear area and input that into the VR headset.
So, when you bring a new VR headset, try to calibrate it according to the free space available in your room. But, you don’t know how to do that? Do not worry. Read the following instruction carefully and act accordingly.
Here is how you can complete the room configuration:
Step 1. Ensure Available Space
In order to experience the virtual world smoothly, you need to make sure that your room has the available playable area. Whenever you play a new game, boundaries are needed to set up according to the game.
But, you can avoid the hassle by implementing some primary rules. Those are given below:
- Make sure that your room has at least 6 Ft X 5 Ft free space for experiencing the virtual world.
- Ensure that you can roam freely within the mentioned space. That means there can not be any obstacles within the area, and not even a wastebasket.
If you have guaranteed those primary stages, proceed to the next step.
Step 2. Set up the Base Stations
Base stations range the room with multiple pulses and/or laser lines. The main purpose of these is to calculate the tracking of the object’s orientation,the velocity of your room.
Here is the proper way to set up your base station:
- Set your base stations in opposite corners of your play area.
- Keep the distance between them 16 Ft (maximum).
- Remove the obstacles between them, if there are any.
Other than these, make sure your base stations are powered properly and they have the optimal angle needed to work precisely.
Step 3. Wire up the Headset
Cable management is the key to configuring the VR appropriately. There are some important things to remember while wiring up.
Here’s how you can wire up the headset:
- Connect all the orange cables with the headset.
- Set the HDMI and USB cables with your computer and start the computer.
- Place your headset in the middle of the free space.
You are all set to start the Steam VR. Connect with the internet. Or you can set up with offline mode if that’s enabled/
Step 4. Run Room Set up
Now that you have arranged everything this far, it’s time to run the room setup. Before you do that, make sure your headset and the controllers are placed in the center of the free space.
Follow the next steps to move further:
- Power up the controllers by pressing the system button that is on the lower side of your controller.
- Click on the SteamVR menu button from your computer’s display.
- Choose Run Room Setup from the listed items.
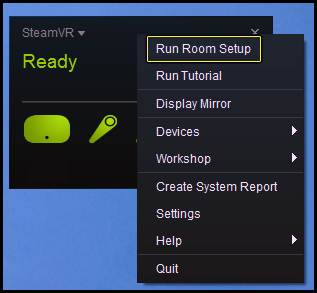
- Select Room-Scale when you are inside the Room setup menu.
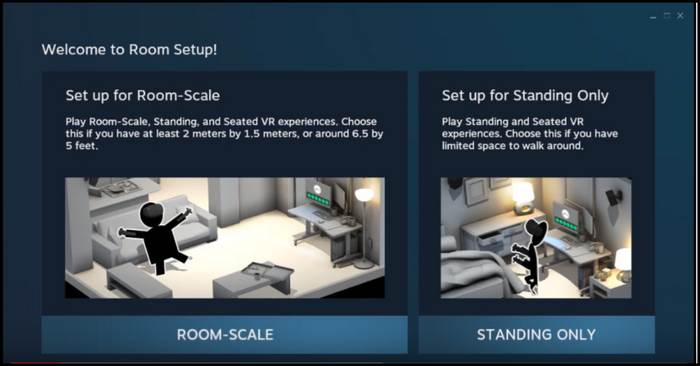
If you have done these adequately, you shall see your controllers and headset are marked as green in the interface. If it’s in gray, repeat the previous steps and proceed to the following action.
Step 5. Calibrate the Floor Level
Before reaching the floor measurement, point either one of your controllers toward the monitor. Press and hold the trigger button while you are pointing to the monitor. This will set the height parameter in your SteamVR.
Follow the next steps to calibrate the floor:
- Locate the controllers at least a foot away from each other.
- Click on the Calibrate floor button on your computer.
- Wait for a moment to set the height in the SteamVR.
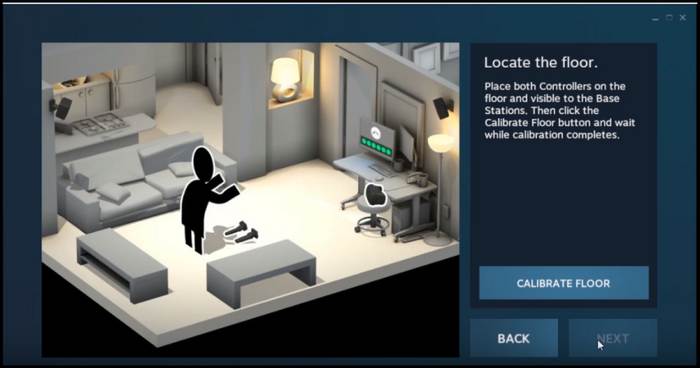
This process will set the lowest height. Do not hold the controllers over floor level.
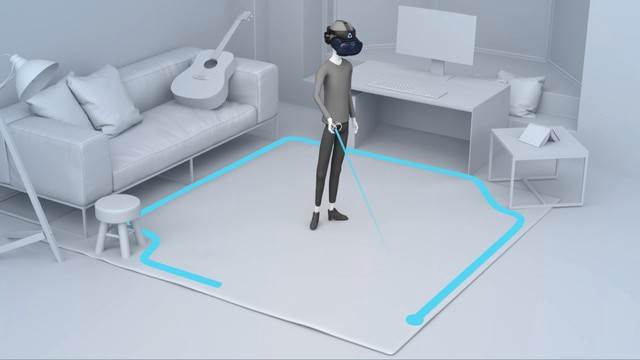
Step 6. Calibrate Your Free Space
Now that you have set the roaming area, it’s time to introduce that area to your Steam VR.
Here’s how you can do that:
- Use any of the controllers to trace the moveable area.
- Walk around the place holding the trigger like you would mark the territory with a paintbrush.
- Avoid getting too close to the furniture if there’s any.
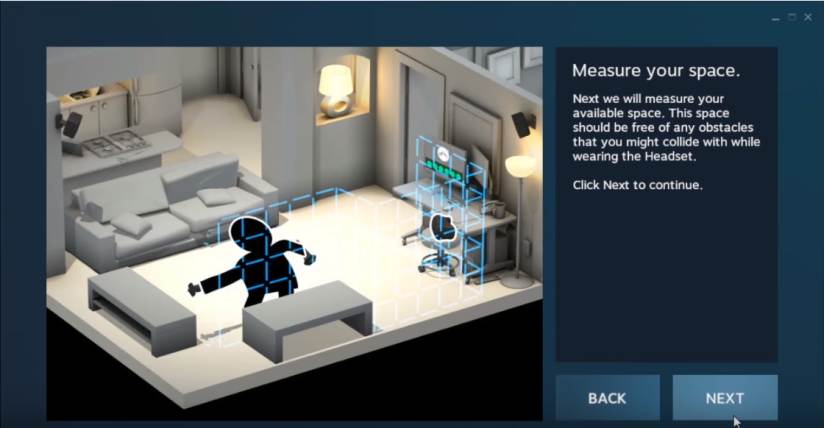
After you do that, you will be able to see the marked up space on the computer interface along with the base stations, controllers, and the headset in a real time view.
Note: Avoid every little object that you think you can overstep. Don’t get too close to any objects when you mark them up.
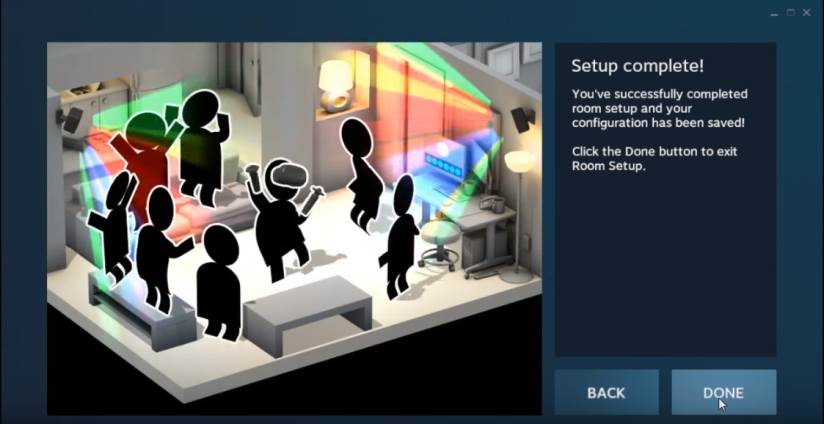
Step 7. Complete the Process
After you trace the play area successfully, you shall notice a green box on the SteamVR interface. That box is the boundary wall of your play area. If the space is not sufficient, the box will be red colored.
If that occurs, make sure you free up more space. If that’s not possible move your entire setup to another room where you can get adequate space. And work from the beginning steps.
If everything is alright, Steam Vr should be set up correctly. Follow on screen steps to complete the setup and enjoy.
This is by far the easiest and most efficient process to calibrate your room for Steam VR. If you are having any specific problem calibrating your Steam VR, read the following parts to find the solution.
Calibrate Steam VR Eye Tracking
You can calibrate steam Vr eye tracking using any headset. Just connect the VR headset to your computer and perform the following steps.
Here’s how you can calibrate SteamVR eye tracking:
- Turn on the controllers and put on your headset.
- Press the system button on your controller.
- Select pro eye from the steam VR dashboard.
- Enable the use eye-tracking and then select Calibrate.
- Follow the dot with your eye after positioning your head to the center.
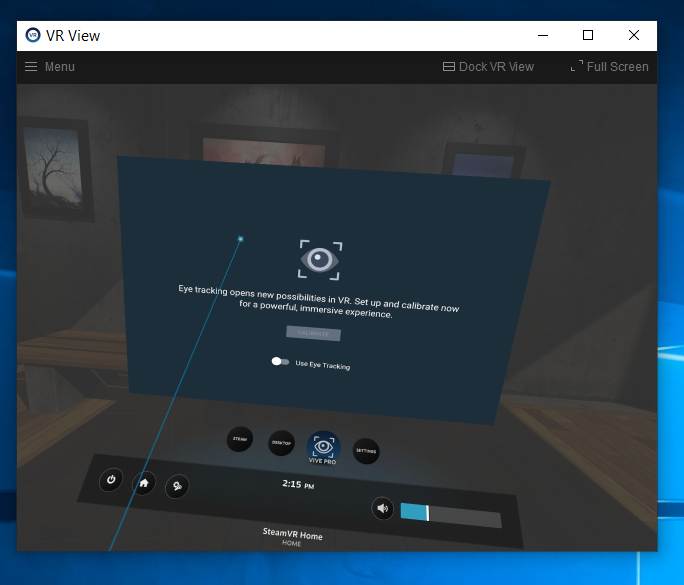
When you effectively complete the eye tracking process, press the system button again to close the SteamVR dashboard.
Calibrate the SteamVR Thumbstick Angle
You can adjust the thumbstick angle using steam VR beta. If your controller’s thumb angle is not properly set up, you can try this trick. Turn on your headset and follow the steps.
Here’s how you can calibrate thumbstick angle:
- Open Steam VR on your computer, make sure the controllers are connected.
- Go to devices > Update Device.
- Locate Pair Controller in the menu.
- Select Configure Controller. You shall see a list of games which you can map.
- Reset the headset once you completed the thumbstick mapping.
When the headset opens up, you shall see the thumbstick angle is right the one you wanted to set.
Conclusion
The last thing I would like to add is, to make sure your play space is clear when you measure the space for your VR experience. If you pet any animals, don’t even let them enter into the measured area.
If you have read every word I have put there, then I can assure you that, calibrating Steam VR won’t be a problem for you. You will be able to calibrate with the skills you already have.
But, then again, if you face any difficulties calibrating the VR, feel free to comment below. I will be happy to help you.
Calibrate thumbsticks worked once but the direction is not quite right. I am no longer getting the ‘confirm’ option after moving the thumbstick fup 5 times. I tried several times and even re-installed Steam to no avail. Any suggestions, please?
If thumbstick calibration in Steam VR worked once but the direction remains off, and the ‘confirm’ option isn’t appearing after moving the thumbstick five times, try restarting Steam VR, checking for physical issues with the thumbstick, updating Steam VR, calibrating outside of Steam VR using the operating system’s tools, and ensuring the VR controller firmware is up to date.