If you have ever run games on a PC, you must have tweaked the in-game settings at some point. But the problem is you need to change the settings for games individually. What if you can configure settings at a global scale?
That’s where the Nvidia Control Panel comes in. Any changes you make here will apply to all games and applications using your GPU.
This article mainly focuses on the best settings for the Nvidia Control Panel, depending on your use case. So follow along and get the best performance out of your video card.
Nvidia Control Panel Revisited
Nvidia Control Panel is part of the GeForce driver for Nvidia GPUs. You can customize 3D Settings, Display Resolution, Power Management, Color Settings, and more from here.
The best part is setting up custom 3D settings that all your games can use.
This improves your performance in games where you are not getting the desired frame rates. As the settings that you change here affect on a global scale, all applications will use the same preset. Most importantly, your time is saved significantly from optimizing every game individually.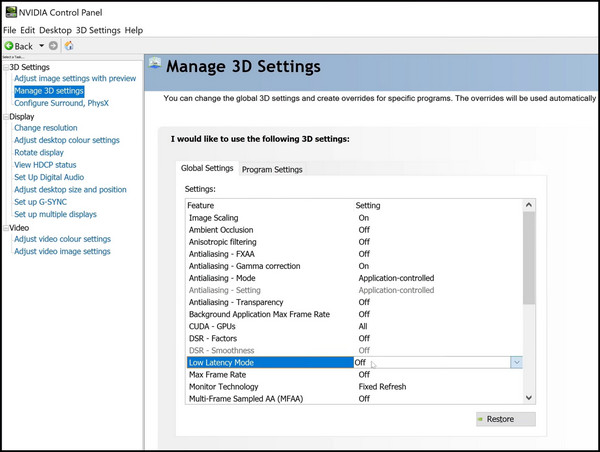
While most people will consider this a tool only useful for gamers, that is not true. Your workload can include editing or encoding/decoding videos using Premier Pro or DaVinci Resolve. If you tweak the correct settings in the Nvidia Control Panel, you can get performance improvements too.
Best Nvidia Control Panel Settings for Gaming
Nvidia Control Panel provides all settings into three groups, namely 3D Settings, Display, and Video.
3D Settings
You will probably spend the most time in the 3D Settings, as it contains the most options to tweak how games will look when in your GPU. There is a large selection of options that you can fine-tune for your system. When using these, you can either go for the best-looking visuals or the maximum frame rate.
I will mention this in the individual sections where you can make such choices.
Let’s start with 3D Settings, then.
These are the best 3D Settings on Nvidia Control Panel for Gaming:
Ambient Occlusion
This casts a shadow on the surfaces of 3D objects to make them more realistic. This deals with the lightning effects and how they show up in the in-game objects.
For competitive shooters, set this to Off. You will get the maximum frame rates.
But if you need realistic shadows, set this to Performance. In story-based games where you have the option to explore open worlds, this is ideal.
Anisotropic Filtering
This implements a newer technique to make textures at a distance appear less blurry to you. A road going down the village will still retain some details when you enable this form of texture filtering.
It is not intensive for your GPU but requires some video memory.
You can set Anisotropic Filtering to Off or in any levels between 2X to 16X
For e-sports titles, set this to Off.
To make the games look the best, set this to 16X.
Anti-Aliasing
This smoothes out the jagged lines in the textures, so they will appear smoothly. There are different types used in games, such as FXAA, TSAA, SSAA, MSAA, etc. Out of these, FXAA is the least taxing, while SSAA produces the best images. But do not use SSAA unless you have a powerful GPU.
| For best performance | For the best visuals | |
|---|---|---|
| Anti-aliasing FXAA | Off | X8 |
| Anti-aliasing Gamma Correction | On | On |
| Anti-aliasing Mode | Off | Application Controlled |
Textures
There are multiple options to set the way your GPU handles the texture of a surface. Once again, you can either go for more frame rates or increased visual fidelity.
| For best performance | For the best visuals | |
|---|---|---|
| Texture Filtering Anioscopic Sample Optimization | On | |
| Texture Filtering Negative LOD Bias | Allow | |
| Quality Settings | High Performance | High Quality |
| Trilinear Optimizations | On | |
Low Latency Mode
Once you turn this on, you will get the minimum latencies with FPS titles that demand the quickest of movements. It basically changes the way your GPU renders the frame sent to it.
When you set it to On, there will be a maximum of one frame that is rendered in the queue. There will be no queue with Ultra mode, and frames are rendered just in time, eliminating the delay.
Nvidia also has an updated technology called Reflex. This builds on the low latency mode and gives you even more boost. Not all games support it, but the ones that support it have an additional Setting where you can set it.
For competitive shooters such as Valorant and MW2, set Low Latency Mode to On and Nvidia Reflex from your supported games to On + Boost.
Power Management
By default, it is set to Normal. That means when your GPU is idle, it will run at lower clock speeds and consume less power.
But if you want to run it at the maximum speeds, set it to Prefer maximum performance.
Shader Cache
After the GPU has rendered frames, the data is saved locally on your PC. When a similar frame is sent to the render queue, the GPU uses the data from the cache. This reduces the GPU load, and the scene is rendered quickly.
If you are familiar with cache files on Windows, the idea is the same here.
For the best performance, set the Shader cache to 10 GB.
VSync
It helps to cap the frame rates to match the refresh rate of your monitor. I do not recommend this, as you can always use the frame limiter within each game to set a maximum FPS. That will not only give you a smoother experience but one that reduces latency as well.
So, for both FPS titles and story-based third-person games, set VSync to Off.
Max Frame Rate
If you limit the frame rate below the refresh rate of your display, the time between each frame is reduced significantly. As the GPU no longer needs to push out more pixels, you will see that the stuttering is reduced significantly.
You do get an option to limit the frame rate in the Nvidia Control Panel. But it is a better choice to use the in-game frame limiters. That way, the difference is evident immediately, and revert any changes without shutting down the game.
Limited frame rates coupled with G-SYNC give you a much better experience in first-person titles, and you should definitely use them.
Display Settings
Here you can change the display resolution, GSYNC, color profiles, and multiple monitors. You have to use your monitor’s maximum resolution and set the maximum refresh rate, which is supported.
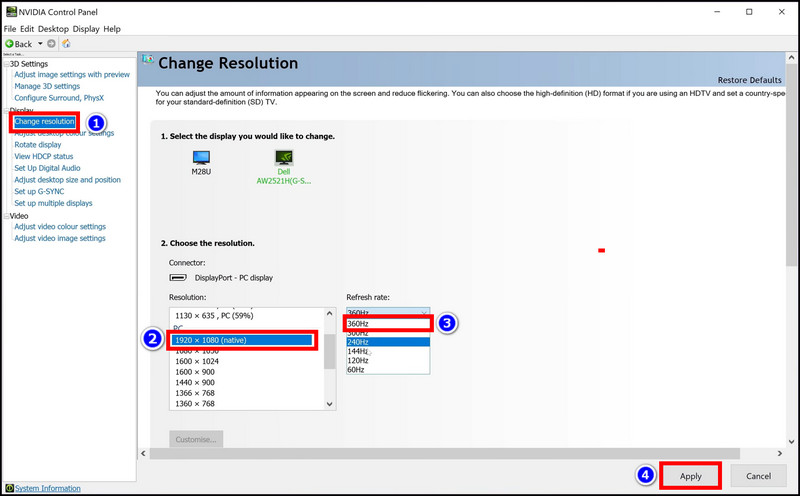
These are the steps to change the display resolution from Nvidia Control Panel:
- Open Nvidia Control Panel.
- Click Change Resolution under Display.
- Click your Primary Monitor. If you only use a single display, there will be only one monitor shown.
- Click the Resolution drop-down menu. Set the monitor to the maximum resolution.
- Press on the Refresh rate. Set the maximum value from the list.
- Click Apply.
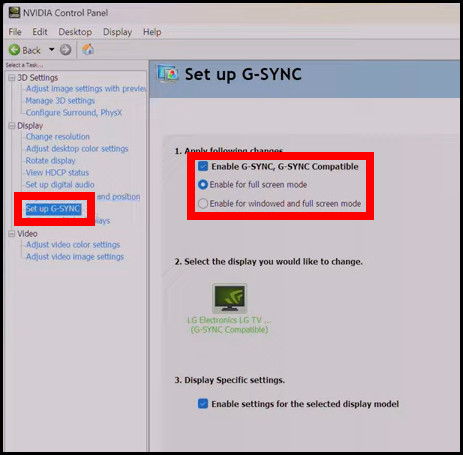
Now, you need to set up G-SYNC. It reduces screen tearing by making the display run at the same refresh rate as your game.
If you have a display that supports this standard, you need to enable it. Note that you only get G-SYNC-supported monitors with a refresh rate of 120 Hz and above.
Follow the steps to set up Nvidia GSYNC from Nvidia Control Panel:
- Right-click and open Nvidia Control Panel on your desktop.
- Click on Set up G-Sync.
- Click the checkbox next to Enable G-SYNC.
- Select Enable for full-screen mode.
- Click the Apply button.
There are debates on if you should use GYNC in fast e-sports titles. To eliminate all possible latencies, you can skip G-SYNC entirely and use a capped frame instead. Ensure you always set the max frame rate just below your display’s refresh rate in the game’s settings.
Video Settings
Sometimes, your monitor can show better colors than what you see now. That is because Nvidia Control Panel is not set to view the full spectrum of colors.
To do that, just set the color to the full RGB spectrum.
These steps will change the color profile from Nvidia’s Control Panel:
- Click on Adjust video color settings under Video.
- Press the Advanced tab.
- Set the Dynamic Range to Full.
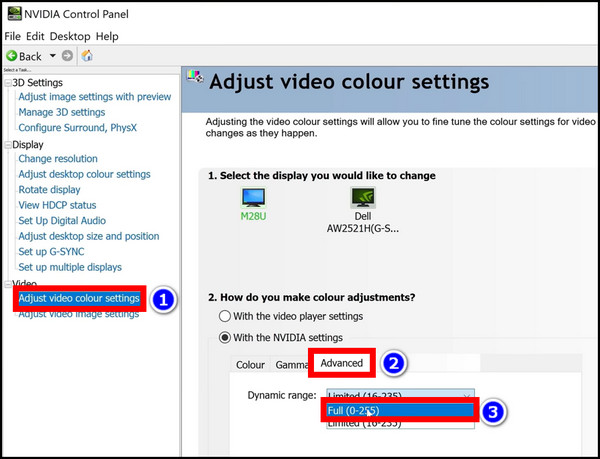
Now every content will look better than before on your display.
Sometimes the Nvidia Control Panel can keep closing no matter how many times you open it. If you face the same issue, check our troubleshooting guide to fix this.
Best Nvidia Control Panel Settings for Running Workloads
Before tweaking the 3D settings, download and install the studio drivers for your GPU. These drivers contain optimizations for apps such as Premier Pro, DaVinci Resolve, or any other applications that leverage your GPU.
The link below takes you to the Nvidia website. Choose your GPU model from the list, the Operating system that you are running, and under Download type, select Studio Drivers. Once downloaded, extract and install it to your system.
📥 Download Nvidia Studio Drivers.
Next, select the application which will use your GPU. I have Premier Pro installed, which I chose. If you run a different application, do navigate along the apps installed folder and select it.
To do this, open Nvidia Control Panel and click on Manage Settings. Click the Program Settings tab and click Add. Choose the app from the list and press the Add Selected Program button.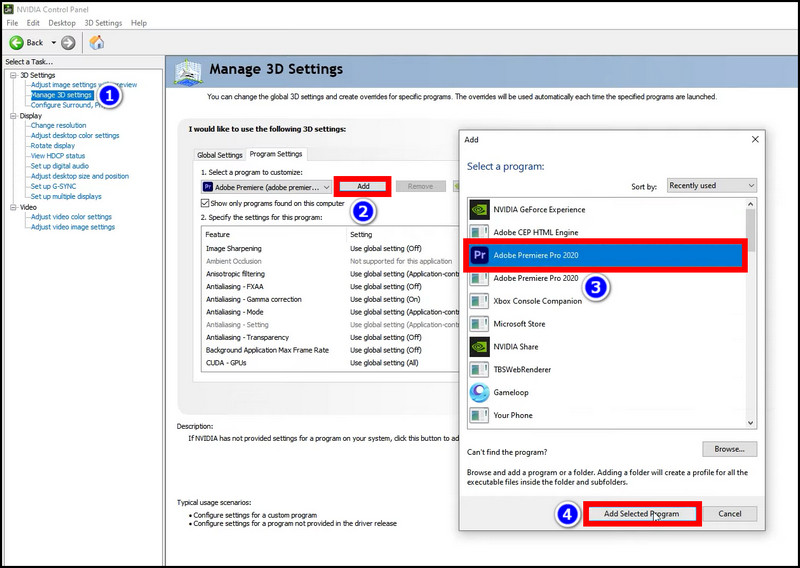
Now you can configure 3D settings specifically for your that application.
Anti-aliasing FXAA to On
Click on CUDA GPUs and select the GPU from the list. A checkbox needs to be ticked, and press the Ok button.
Set Open GL Rendering GPU to your installed graphics card.
Set Texture Filter to Quality
Set Triple buffering to On.
Once you set everything, press the Apply button at the bottom.
If you feel that these settings are not working for you, click on Restore Defaults. Then the factory settings that Nvidia has set up will be used.
Next, you want to set your GPU as the Physx rendering engine. This is important as applications that utilize it will then use your graphics card specifically. The load from your CPU is reduced drastically, and overall performance improves.
To do this, click on Configure Surround, Physx. Here select your GPU under Processor in Physx Settings.
Finally, set the color to Full. This will allow you to display all the colors on your video properly. Then you can edit the videos properly. To do this, open Nvidia Control Panel and navigate to Adjust video color > Advanced > Dynamic Range, and set this to Full.
All the configurations on the Nvidia Control Panel are done.
Now make sure the application is set to use GPU acceleration from its settings. For example, on Premier Pro, I have selected the Mercury Playback Engine (CUDA). This uses the GPU to accelerate the encoding tasks, significantly speeding up the job.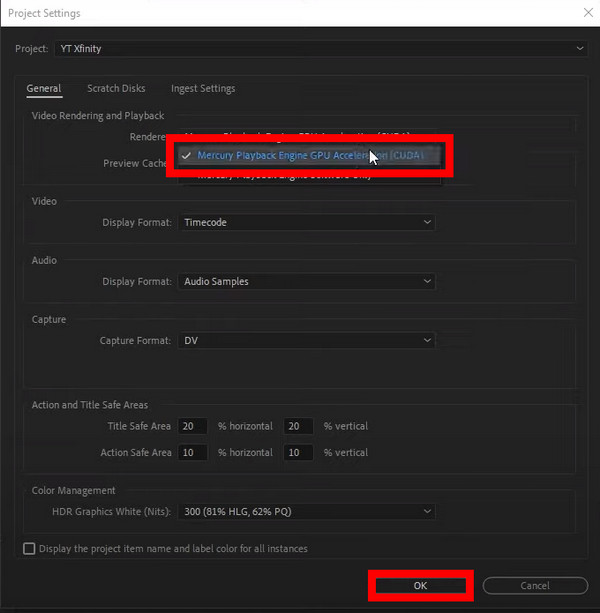
After you have set this correctly, run a task and see if the GPU is actually being used. The GPU tab on the task manager will show you exactly how much you are utilizing it.
What if the Nvidia Control Panel is missing entirely from your computer? Check our guide and bring it back instantly.
Final Words
Who would want games to lag even with a beefy GPU installed? That is the motivation behind this piece, which will help you get the best out of your GPU.
That’s all for today.
See you next time.