Do you find it worrisome to enter your password every time you turn on the computer? Then you are not alone.
Thankfully, you can bypass the lock screen by automating the login process to start your device without entering a password.
In this guide, I will show you how to enable automatic log in features in Windows 10 in several ways.
So, let’s get started!
How to Turn On Automatic Login on Windows 10
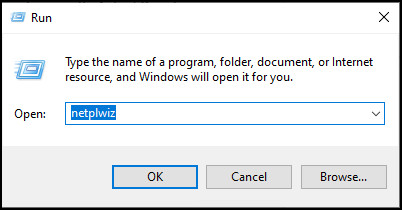
You can enable the automatic login by changing the User Accounts settings. Open the Run dialog by pressing Windows + R keys, type netplwiz in the text box, and hit Enter. When prompted, uncheck the Users must enter a user name and password to use this computer checkbox.
It will ask for your login credentials. Enter the credentials to confirm the changes. That will instantly enable the auto login feature, and you won’t need to type your password when you boot your device.
Besides, some additional methods exist to turn on the automatic login feature in Windows 10. For more information, follow the subsequent step-by-step instructions.
Here are the methods to turn on automatic login on Windows 10:
1. Use Windows Autologon
The most affordable way to enable automatic login in Windows 10 is by changing the User Accounts settings. The following procedure will help to bypass the login requirements.
Here are the steps to enable auto login using Windows autologon:
- Press Windows + R keys to open the Run dialog box.
- Type netplwiz in the text box and hit Enter.
- Remove the tick for Users must enter a user name and password to use this computer checkbox.
- Click OK to save the changes.
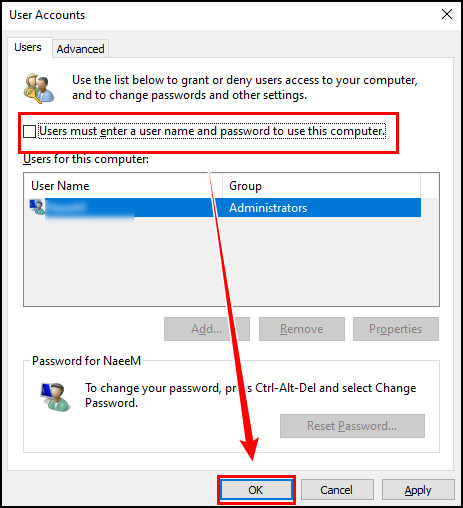
- Type username and password twice to confirm the changes when prompted.
If you find the Users must enter a username and password to use this computer checkbox as unchecked, check it, and then uncheck it again.
Sometimes, you may find the Users must enter a user name and password to use this computer checkbox missing. You can use Command Prompt to resolve this issue by following the subsequent procedure.
Here is the procedure to enable missing User Accounts settings:
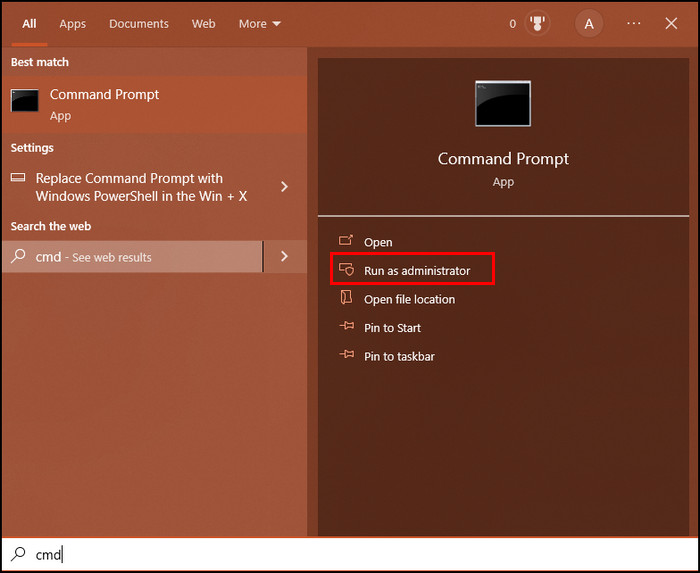
- Click on the Start button and search CMD.
- Choose Run as administrator.
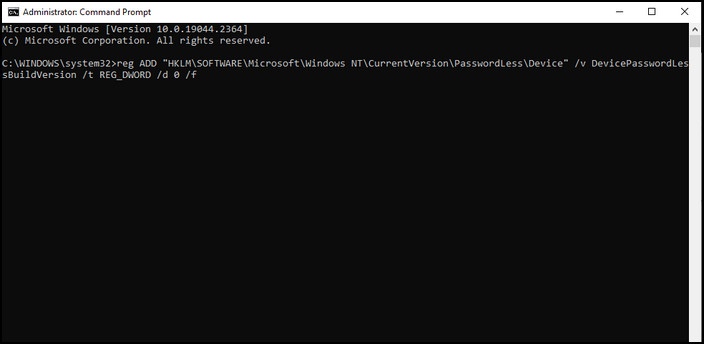
- Enter the following command:
- reg ADD “HKLM\SOFTWARE\Microsoft\Windows NT\CurrentVersion\PasswordLess\Device” /v DevicePasswordLessBuildVersion /t REG_DWORD /d 0 /f
- Press the Enter key.
The above method will bring back the User Accounts settings, and you can change the settings now by following the first method.
It is also possible to enable auto login for Windows 11 devices. If you are using Windows 11, check our separate post on how to enable auto login in Windows 11.
2. Use Registry Editor
Tweaking the registry is always risky. Any wrong steps can have negative effects on the system files and settings. So it’s always worthwhile to create a restore point or back up your registry settings.
Sometimes, you may not log in on Windows for several reasons. If your Windows is stuck before login, check out another post on how to fix Windows is stuck at the lock screen.
Consider the following instructions to disable the lock screen and enable the auto login feature for your Windows 10 device using the Registry Editor.
Here is the way to turn on auto-login using Registry Editor:
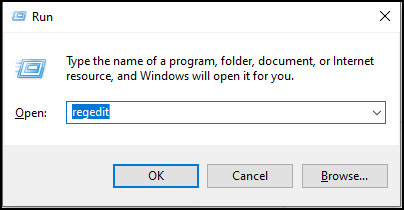
- Open the Run dialog by pressing Windows + R keys.
- Type regedit in the text field and hit Enter.
- Go to the following location in Registry Editor:
- Computer\HKEY_LOCAL_MACHINE\SOFTWARE\Microsoft\Windows NT\CurrentVersion\Winlogon
- Locate DefaultUserName and double-click to open it. In case the DefaultUserName is missing, create a new value by navigating to New > String Value.
- Enter your username in the Value data field and click OK.

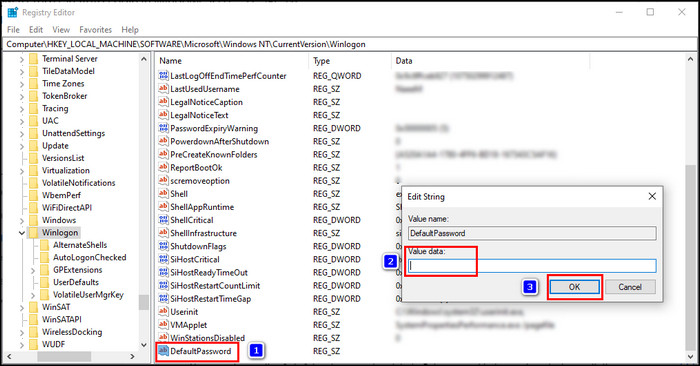
- Locate DefaultPassword and double-click to open it. If you don’t see the DefaultPassword field, create a new one by navigating to New > String Value.
- Enter your password in the Value data field and click OK.
- Locate AutoAdminLogon and double-click to open it. If the AutoAdminLogon field is missing, create a new one by navigating to New > String Value.
- Type 1 in the Value data field and click OK.
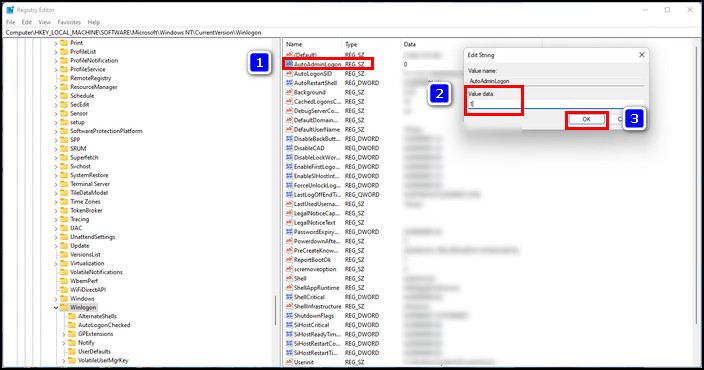
After saving the changes, restart your device. It will directly take you to the desktop without asking for your password.
You can change the AutoAdminLogon value data to 0 if you need to turn the automatic login off. It is also possible to import & export registry keys from command line.
If you find this process complex, you can use an application to enable auto login by following the below instructions.
3. Use an Application
If you often need to turn the auto login feature on and off, you can use an application to assist you without diving into the deeper settings discussed above.
Autologon is an application available on the official Microsoft website that can turn on and off auto-login with a single click.
You can also use the portable version in case you are not interested in installing a new application on your machine. Go through the subsequent procedure to download and use Autologon.
Here is the instruction to use the Autologon application:
- Open your browser and go to Autologon official site.
- Download and extract the Zip file.

- Double-click on the installation file.
- Select Agree in the Autologon License Agreement.
- Enter username and domain in the Username and Domain fields. If you see the fields are already filled, skip this part.
- Type your system password in the Password field.
- Click Enable.
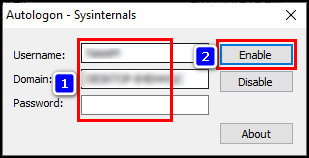
Once you successfully configure the Autologon fields, you will see a new window saying Autologon successfully configured. You can also disable auto-login by following the same method; just choose Disable at the end.
Follow our guide on how to disable accidental drag and drop in Windows 11.
Frequently Asked Questions
What is Windows auto logon?
Windows auto logon is a feature that allows users to access the device without entering their username and password. Once the feature is enabled, Windows will skip the lock screen page.
When should I turn on automatic login in Windows 10?
If your device is in a secure place where you want to share access with all users, you can turn on the auto logon feature to create easy access for everyone.
How do I turn off automatic login in Windows 10?
To turn off the automatic login feature in Windows, open the User Accounts settings. To do so, press the Windows + R keys, type netplwiz in the text box, and then hit Enter. Tick the Users must enter a username and password to use this computer checkbox and click Apply.
Concluding Words
Before turning on the automatic login features in Windows 10, I suggest you ensure the device is only accessible to trustworthy people.
Otherwise, there is a great chance of losing your saved passwords and files. You can simply turn off the feature when you need to share your device with unreliable people.
Which method did you find easier for enabling automatic log in features? Let me know in the comment below.