Have you ever tried running super old games on your new 13th gen PC? Sometimes these games cannot recognize multi-cores correctly and result in crashes.
This is mostly due to apps built for single-core processors. As they are only meant to utilize a single core, the app’s programming fails to use the hybrid architecture of modern PCs.

A possible fix is setting the app to only use a single core. And you can easily configure this in Windows 10 and 11. So, let’s take a look at how you can do that.
What is CPU Affinity?
A CPU affinity is when you assign a process to only use the cores that you have specified for them. For example, if you select Chrome to only use Core 0, it cannot use the other cores. The remaining cores are used for running the other applications.
When you start your computer, many processes start executing. Every application has its own processes which are broken down into threads that contain these instructions. The operating system is responsible for running the scheduling algorithms that send the instructions for execution.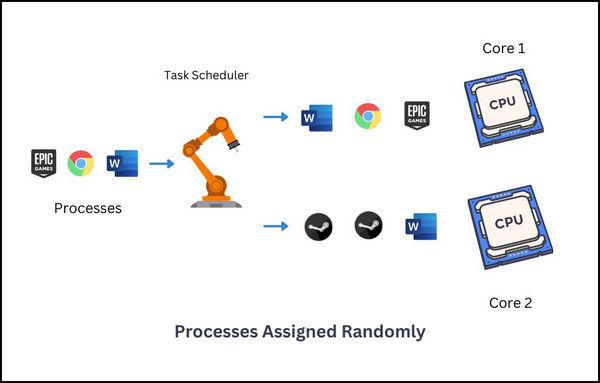
Now if you set a process (such as Chrome) to use only one core, you are interfering with the scheduling algorithm. The OS will not assign the instructions to different cores. Instead, it will only use the core that you allow it to.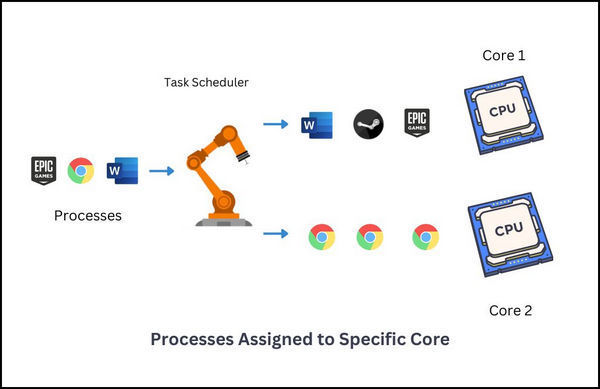
Does CPU Affinity Increase Performance?
Yes, you can see some improvement in performance if you set the CPU affinity on an app. But these have many factors connected to them.
Whether the app utilizes single/multi-core architecture and if hyperthreading is supported are some big questions that remain that need to be answered.
For very old apps and games, you could limit the process using only a single CPU core. Doing that can get you a good performance. That way, the app will behave in the same way as if it is running in a single-core system.
But what happens when you assign one core to modern apps?
Then you will experience slowdowns. As apps now are written for multi-core systems, they will be severely bottlenecked, and the CPU bottleneck is bad for your PC. All the instructions from the apps will only be executed by one core and you can see that in its performance.
Some games do not do very well with hyperthreading. For them, the performance will be better if you only set them to run on the physical cores. CS: GO is a classic example here. Some users have got more performance by disabling hyperthreading.
In general, you should not change the CPU affinity of an app unless you know if you will get performance benefits out of it. It is better to let the OS handle the task scheduling part.
But if you are certain that assigning a specific core to a process will yield better performance, I will show you how to do that in the next section.
In case you are wondering how many cores you need on your system, check our detailed guide where we explore the number of CPU cores you need based on your workload.
How to Set CPU Affinity in Windows 10/11
To set the CPU affinity for a specific app, you have to open Task Manger and select the process. Next, go into the details for the process and here you can set which cores will be pinned for running the selected app.
Let’s go through the detailed steps now.
These are the steps to set the CPU Affinity in Windows 10 and 11:
- Open Task Manager.
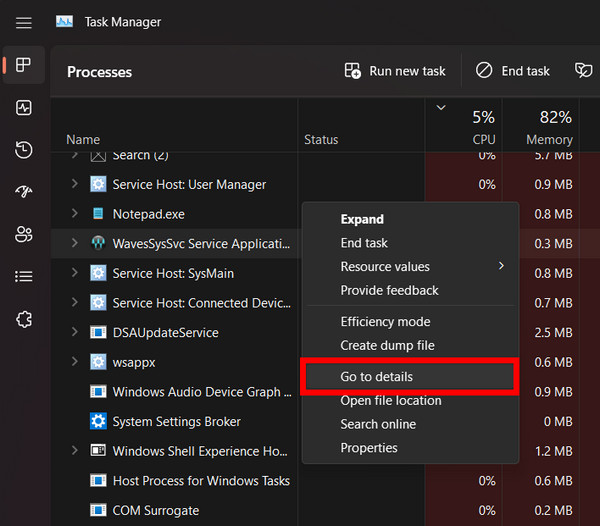
- Under Processes, scroll down and right-click on the app. Select Go to details.
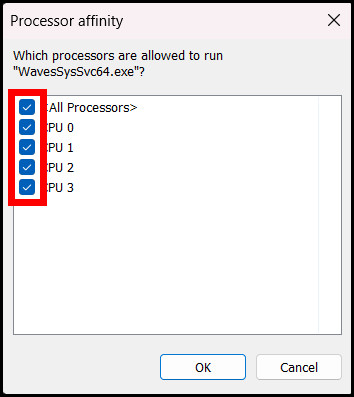
- Right-click on the process and select Set Affinity.
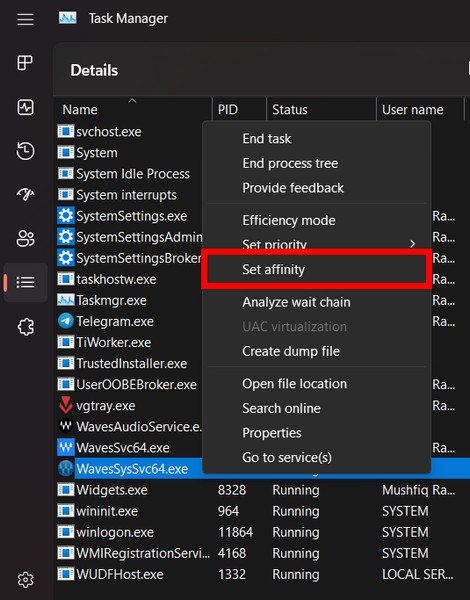
- Here you can choose which cores can the process specifically use. Remove the tick next to each core to limit the processor from using them.
Now, it’s time for some evaluation.
Run the application and perform some benchmarks (for a game). The before and after results will give you a good idea of the performance improvements if any. For any slowdowns, you can always change the app to back and change to use all the available cores.
How to Set CPU Affinity Permanently for an App on Windows 10/11
If you are happy with the performance of the application using only a few cores, how about setting this preference permanently?
For testing purposes, you can toggle between the number of cores using the above step. But the problem is, every time you close the app or shut down Windows, that setting is lost. Meaning you have to set the CPU Affinity every single time you use the application.
To reduce this hassle, you can create a new shortcut on your desktop which will have the CPU affinity settings attached to it. Just open the shortcut and the app will run using the number of cores that you have set.
Cool right? But how to do that?
First, you need to decide the cores you will be using. The previous section should help you on deciding that.
Once you have decided on which cores to use, you need to generate a hexadecimal value for it based on its binary number of arrangement. Getting too complicated? Let me dial down a bit.
Let’s say I have selected the first and fourth cores to be used by Chrome. For active cores, the binary is 1, and if unused will be 0. Then the binary number of the status of the CPU cores should be 1001.
I am only using a quad-core processor, so there are only 4 digits for me. If you have a hyperthreaded processor, this number will increase.
This image should clear any confusion that remains with the binary values.
Now use any online tool to convert the binary digit to hexadecimal. Once you have it note it down. The hexadecimal number that I converted was 9.
It is time to now create a shortcut and embed these settings for our app.
Follow the steps to permanently set the CPU Affinity on Windows 10 and 11:
- Right-click on the app’s shortcut and copy its location in the Target field.

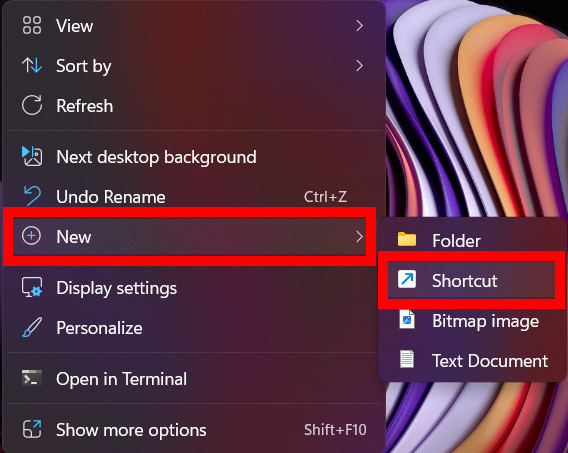
- Now right on the desktop and select New > Shortcut.
- Insert the program’s target location and the CPU affinity in the code: cmd.exe /c start “App Name” /High /affinity value “App’s Target Location”. When inserted properly, click on Next.

- Give the app shortcut a name, and click Ok.
Now you would launch the app or game using this shortcut every time. That way it will use the number of cores you have selected for them.
In case you are using Linux over Windows, you can also set the affinity in your computer. Check out another article to set CPU affinity on Linux.
Frequently Asked Questions
Should I set CPU affinity?
If you are certain that assigning specific cores to an app will increase its performance, you can set CPU affinity. But for most applications, Windows will ensure that its task scheduling will provide the best results with the apps that you use.
How do I permanently set CPU affinity?
To set the permanent CPU affinity of an app, create a shortcut. In the shortcut target field, enter the CPU affinity value and the location where the app is installed. Once done, save the shortcut. Now you should use this shortcut to launch the app every time.
Final Words
Changing CPU affinity means you are the one controlling the application’s performance. When not getting the desired performance that you expect from an app, this option can help you.
But do not go about changing this setting for all applications. Explore which apps can be beneficial from such tweaking and make changes accordingly.
That’s all for today. See you next time in some other performance guides.