People often wonder what they can do to reduce the power consumption & heat produced by their laptops. There are many articles written on it, all babbling & rumbling about methods that don’t exactly work.
The actual way to achieve that objective is to disable some logical CPU cores of your device. But what’s the safe procedure to do so?

Let’s dive into this article & discuss everything you need to learn about disabling CPU cores.
How to Disable/Limit CPU Cores on Windows/Linux
To disable logical CPU cores on Windows 10/11, right-click on This PC & select Properties. Click on Advanced system options & select Environment Variables from the Advanced tab. Now, from the System variables section, select NUMBERS_OF_PROCESSORS and hit Edit.
Then set the number of logical cores you want to keep active on your computer and click OK.
There’s another alternate method that’ll give the same results. Below, I will thoroughly discuss both methods, along with how to disable CPU cores on Linux.
Disable CPU cores on Windows 10/11
You can limit the CPU cores from either System Properties or System Configuration. Personally, I prefer the second one. Before we begin, check how many CPU cores you have and determine how many cores you want to keep active.
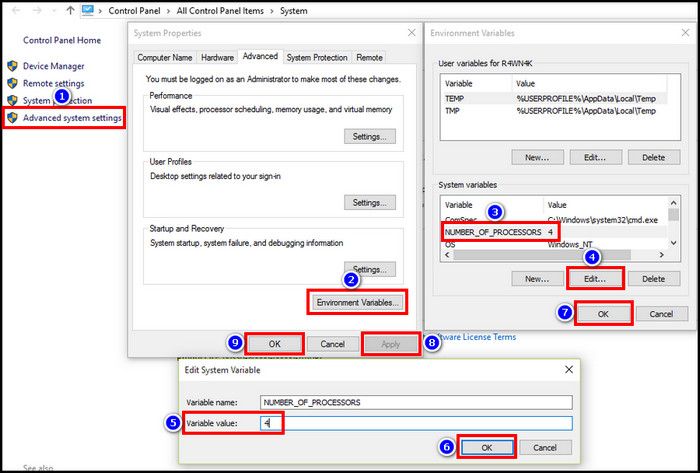
Method 1: Disable CPU cores from System Properties
- Right-click on This PC and select Properties.

- Click on Advanced system options.
- Navigate to the Advanced tab and select Environment Variables…
- Select NUMBERS_OF_PROCESSORS and click on Edit…
- Put the number of cores you want active on your PC in the Variable value: box.
- Hit OK > OK > APPLY > OK.
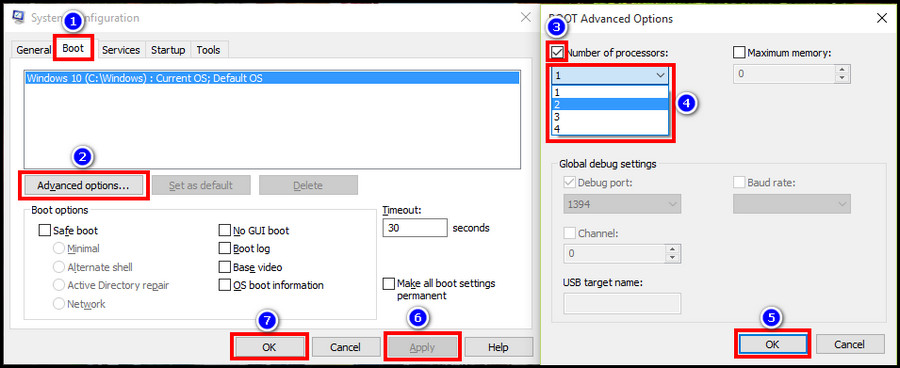
Method 2: Disable CPU cores from System Configuration
- Press Windows key+R and type msconfig.

- Hit the Enter button on your keyboard.
- Go to the Boot tab and click on Advanced options…
- Tick the box for Number of processors: and click on the drop-down menu below it.
- Select the number of cores you want active on your computer.
- Hit OK.
Now reboot your computer and the logical core counts will be limited to your set value. Since it’s not affecting the hardware, you can follow the same steps to enable all disabled CPU cores in Windows 11 whenever you want.
Disable CPU cores on Linux
The procedure of disabling processor cores is quite different on Linux than on Windows PCs. To limit the CPU cores on Linux devices, you need to use the Grub menu and add parameters to the kernel entry.
The Grub menu is responsible for launching the Linux OS. You should find it when starting up your PC. Select the entry you want to use and press E to open a menu. You’ll see the following lines or something similar depending on the version.
root (hd0,5)
kernel /boot/vmlinuz-2.6.22-14-generic root=UUID=a8a39729-9d2a-425b-b84b-ecc5c7dad104 ro quiet splash
initrd /boot/initrd.img-2.6.22-14-generic
quiet
Now, use the arrow key to go to the entry that begins with the word kernel and press E again. At the end of that line, input the following command: maxcpus=1
So the end result should look like this:
Now reboot your device to apply the changes. These parameters are sent directly to the core when the Linux is booting up.
What Are the Benefits of Disabling CPU Cores?
There are many benefits of disabling the processor count in a system. Limiting the CPU cores can be beneficial when you want to decrease the power draw of your device and increase battery life. It’s an effective method to fix overheating issues as well.
Additionally, certain applications aren’t compatible with multi-core processing. It’s also used to test whether a core is functioning properly during heavy loads by isolating other cores.
Here are the benefits of disabling CPU cores:
- Less power draw equals more battery life for laptops.
- Less heat.
- Increased performance in some cases.
- Testing compatibility of single-threaded programs.
Another way to save power is configuring the CPU affinity, but that only applies to one process, not throughout the system. So, disabling the core counts of a system is a definitive method for the above-mentioned benefits.
Apart from all the perks, shutting down too many logical cores may hurt performance. It does, actually. Because you need a certain amount of cores on your CPU to have a seamless user experience.
Though, there’s a distinct difference between physical and logical CPU cores.
Frequently Asked Questions
How do I disable Intel CPU cores?
Press Win+R, type msconfig and hit Enter. Now go to the Boot tab and select Advanced options. Then tick the Number of processors box and select how many cores you want active on your computer from the drop-down menu. This will disable the rest of the cores.
Does disabling cores save power?
Yes. Disabling a few cores will reduce the power consumption by the processor and hence save power.
Can disabling cores improve performance?
In some cases, disabling a few cores can improve performance due to reduced power consumption & heat output. But in many situations, such as gaming, it might not be the case.
Wrapping Up
Note that these methods won’t physically affect the hardware of your device. You can revert back to the default number of cores anytime.
That’s about it. Hopefully, this write-up has allowed you to limit the logical core counts on your PC.
Have a good one!