You may enable and use the shader pre-caching feature in steam, and now you might wonder that enabling this feature may slightly increase disk and bandwidth usage.
Don’t worry. You are in the right place, then.
Today, as a tech and gaming specialist, I will show you how you disable the shader pre-caching feature in steam.

Don’t skip any part and precisely follow the instruction.
So, let’s get started on the main topic.
What Is Steam Shader Pre-Caching?
Steam has released a new version that includes Steam Shader Pre-Caching, which improves game load times and reduces shuttering.
Shader Pre-Caching feature improves framerate stability and allows games to load faster. This feature enables Steam to download GPU shaders that are already pre-compiled and optimized for your system.
Shader Pre-Caching is a valuable tool for gamers that reduce shuttering during gaming, especially in games based on OpenGL and Vulkan. Some of the games use a lot of shaders, which help reduce game shuttering.
In graphics applications, some shaders functions are used to calculate the colors of pixels. These shaders are typically created when a game uses the Vulkan or OpenGL graphics APIs.
Before starting the game, Shader Pre-Caching technology analyzes your computer’s graphics hardware and downloads and pre-compiles shaders. This feature improves game load times, reduces shuttering, and provides more consistent performance.
Read more on how to Set Steam to Start Automatically.
How To Disable Shader Pre-Caching In Steam
Shader Pre-Caching enables Steam to download pre-compiled GPU shaders that improve game load times and reduce shuttering.
Steam will acquire shaders from your system as needed if you enable this option. The only disadvantage of this feature is that if this feature is enabled, the use of disk space and bandwidth may be slightly increased.
Some users reported that shaders are using many gigabytes. If you are facing this problem, you can disable this feature. If you want to disable this feature, you can do it in the Steam Settings.
Also related: SteamVR Error 306.
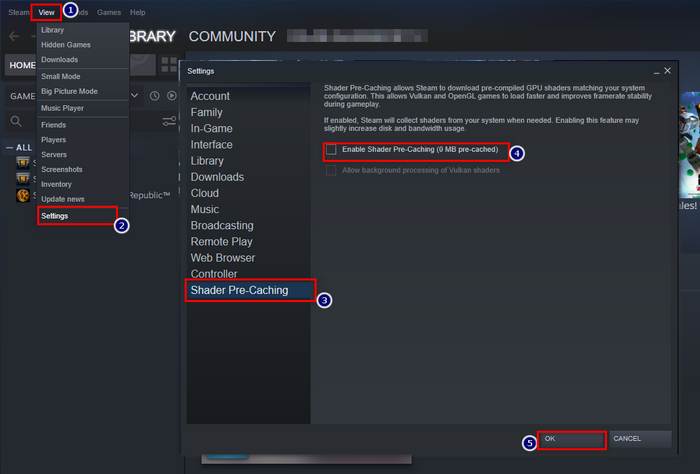
Here are the steps to disable Shader Pre-Caching in Steam:
- Select Steam on the Steam window.
- Choose Settings from the drop-down list to open Steam settings.
- Select the Shader Pre-Caching tab at the bottom of the left side menu panel.
- Uncheck the Enable Shader Pre-Caching option.
- Press the Ok button to save the changes.
Now, you successfully disable the shader pre-caching on your steam.
If you want to reduce the stress on your pc or storage device and want to stop Steam from opening on startup, please follow the simple steps below.
How To Enable Shader Pre-Caching In Steam
Steam may download pre-compiled GPU shaders that match your system settings via Shader Pre-Caching.
Shader Pre-Caching reduces the time it takes for relevant games to load for the first time and enhances as well as enhancing or provides more consistent performance.
Follow the steps to enable Shader Pre-Caching in Steam:
- Select Steam on the Steam window.
- Choose Settings from the drop-down list to open Steam settings.
- Select the Shader Pre-Caching tab of the left side menu panel.
- Check the Enable Shader Pre-Caching option.
- Press the Ok button to save the changes.
Now, you successfully enable the shader pre-caching on your steam.
Related content you should read: SteamVR not Recognizing Oculus Quest 2.
How To Disable Shader Cache On Nvidia
Shader Cache is a feature that improves the game load times, decreases CPU usage, and reduces shuttering. It is a GPU feature that provides GPU drivers control panels.
The game requires a Shader Cache on any platform to run smoothly without any freezes or visual defects.
Sometimes this feature increases disk spaces. When this feature is enabled, the use of disk space and bandwidth may be slightly increased. If you want to prevent the use of disk space and bandwidth, you need to disable the shader cache on your Nvidia control panel.
Follow our guide on how to Uninstall Steam VR.
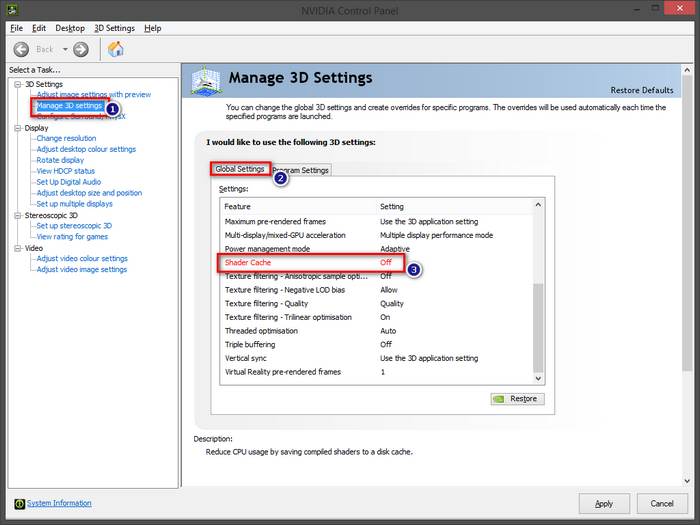
Follow these steps to disable shader cache on Nvidia:
- Right-click on Desktop and select NVIDIA Control Panel.
- Open your NVIDIA Control Panel.
- Select Manage 3D Settings.
- Find out Shader Cache size on the Global Settings panel.
- Click on the Shader Cache size drop-down menu to open available options.
- Choose the Disabled option.
- Click on the Apply button in the bottom-right corner to save the changes.
After clicking on the apply button, you save the changes and successfully disable the shader cache on Nvidia.
How To Disable Shader Cache On AMD
Shader Cache reduces CPU consumption and speeds up game loading times by building and storing frequently used game shaders instead of regenerating them every time they’re needed.
In AMD Radeon Graphics settings, the shader cache is turned on by default. If you need to disable the shader cache, you can do it on the Global Graphics settings.
Follow these steps to disable shader cache in AMD:
- Open your Radeon Settings on your system.
- Select the Gaming tab.
- Open the Global Settings window.
- Select Global Graphics.
- Find out the Shader Cache option and turn it off.
After turning off the shader cache option on your AMD Radeon graphics settings panel, you successfully disable the shader cache on Nvidia.
Why Shader Pre-Caching Content Keeps Redownloading
Sometimes, shader pre-caching content keeps downloading because your games need shader cache files. This case does not only happen on Linux OS. Nowadays, all OS platform like Windows has this same case.
There are a few games that redownload their shader cache regularly. They’re even listed as having a maximum/maximum MB limit in the queue. Even so, they redownload from the beginning, and everything seems to be acceptable for the time being.
However, some users experience that the download size of shader pre-cache content is vast in some cases. Sometimes, it is a bit annoying because it downloads the same games whenever users startup steams.
In Steam, keeping shader pre-caching content redownloading is not normal. It can be stopping you from playing games because it takes so long to finish the download shader pre-cache files. They also fill up the download list.
Also read, how to Fix Steam Link Setup: No Host Computers Found.
Final Thoughts
Shader Pre-Caching is a valuable tool for gamers that improves game load times, reduces shuttering, and provides consistent performance. This feature improves framerate stability and allows Vulkan and OpenGL games to load faster.
In this post, I describe the shader pre-caching and how you enable or disable the shader pre-caching feature. Also, I describe how you disable shader cache on Nvidia and AMD using the GPU control panel.
After following all the instructions carefully, now you can enable or disable shader pre-caching in steam. Also, you can disable the shader chasing feature on Nvidia and AMD.
I hope this post is helpful for you. Leave a comment below to share your opinion, and also, feel free to share your experience with your friends and other readers.