When you install a new processor on the motherboard, it often fails to turn on. It mainly happens because the mobo fails to connect with the new CPU.
In this case, updating the BIOS will solve the issue. Since there is no processor on the motherboard, you may ask whether updating BIOS without the CPU is possible.
The question itself is tricky. That’s why, in this article, I will elaborately explain that.
So, tag along.
Can You Update the BIOS Without a CPU?
In short, yes, you can update BIOS without a processor. Actually, it’s pretty easy. You can do that using a flash drive. But not all motherboards can support that. Flashing BIOS without a processor is possible on Gigabyte, Asus, ASRock, and MSI motherboards.
There is also a limitation in those four motherboards. You must have a motherboard model B550 and X570 or above. Because in those motherboards, there is a flashback button.
This button is not available on any lesser-model motherboards. Do you know about your motherboard? If you don’t, check our quick guide to finding out what motherboard you have on your computer.
You can upgrade if you have any of these four motherboards, and the model number is B550 or X570 or more. So, you must check all details and information about your motherboard before you take your step toward updating your PC’s BIOS (Basic Input or Output System).
Another important thing you should be aware of. The name of the BIOS Flashback feature differs and depends on the motherboard manufacturer.
Check out the BIOS button name of different motherboards below:
- Asus: USB BIOS Flashback.
- ASRock: BIOS Flashback Button.
- MSI: Flash BIOS Button.
- Gigabyte: Q-Flash Plus.
Note: Don’t mix Q-Flash Plus with Q-Flash and Flash BIOS Button with M-Flash.
The manufacturer’s website lets you know whether your motherboard has the BIOS update option. It is generally located under the Tech Specs & Special Features section.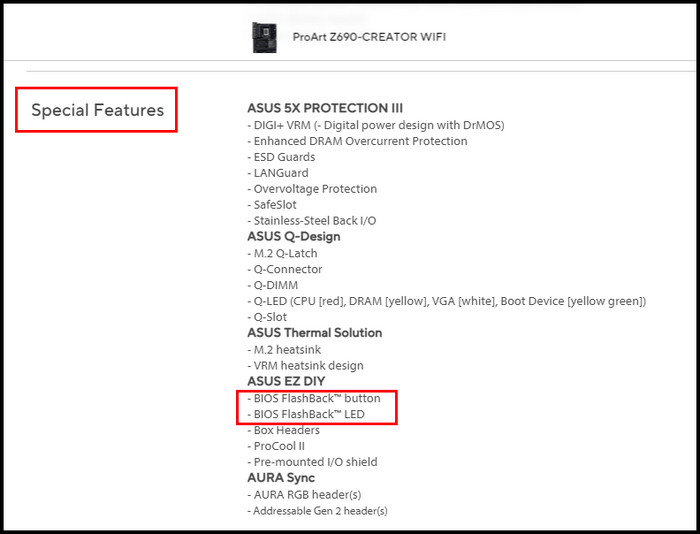 Are you wondering if you can get into the BIOS settings without the presence of a processor? To know that answer, read our separate guide on whether it is possible to enter BIOS without a CPU.
In the following section, I have discussed the updating process in detail.
How to Update Your BIOS Without a CPU
To update BIOS without a processor, you will need two things: a USB flash drive and the latest BIOS file. Once you have those, extract & rename the BIOS file. Format the drive in FAT32. Copy-paste the file into the drive. Put the device in the motherboard & press the BIOS button.
The BIOS light will start beeping. Once it’s finished, the light will go off. It means the update process is complete.
The whole process seems pretty straightforward, doesn’t it? Check out the details below to understand the entire updating procedure better.
Here are the steps to upgrade BIOS apart from a processor:
1. Download the Recently Updated BIOS File
The first and foremost thing you must do is download the latest BIOS file. You will find the file on your mobo manufacturer’s official website.
Follow the process below to download the latest BIOS file from the motherboard manufacturer’s website:
- Go to the Gigabyte, ASRock, Asus, or MSI website.
- Look for the Support option and click on it.

- Move down, locate BIOS, and click on it.
- Press on the latest version to download the file.
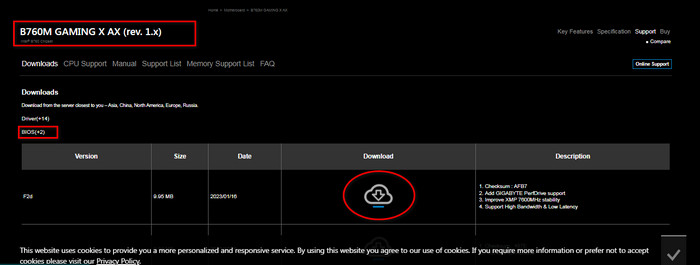
Note: Don’t download the beta version. Instead, go for its previous ones, which have a full version of the file. Moreover, if you see the file came on the website over a week or month ago, you can download it. Otherwise, you shouldn’t.
2. Extract and Rename BIOS Files
When the download is finished, go to the file location. The file should be downloaded as a zip file.
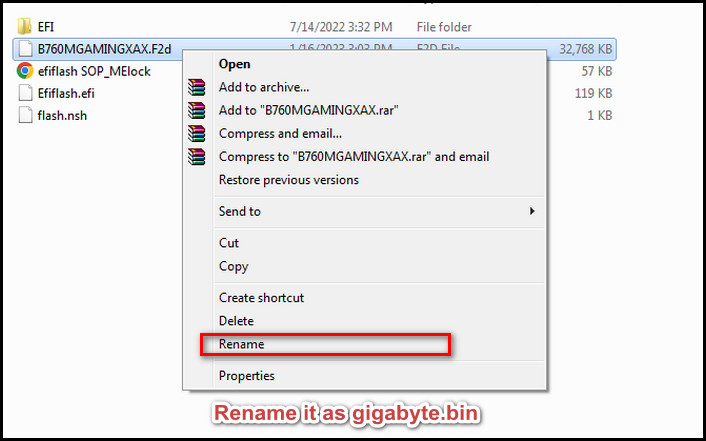
Right-click on the zip file and select the Extract Files option. Rename the BIOS file after the extraction is finished.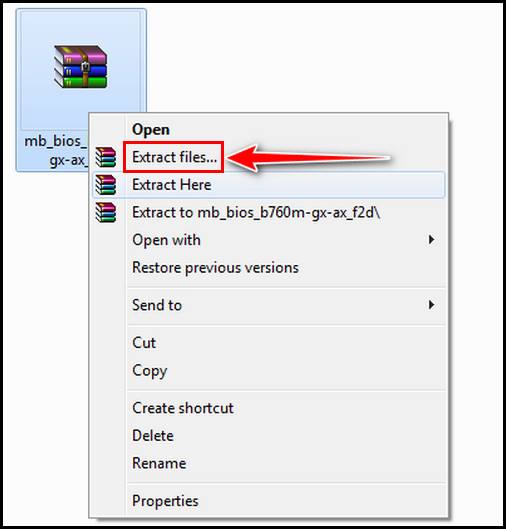
If your motherboard is ASUS, you will get a renaming tool, such as BIOSRenamer.exe, with the flashback folder. The name and format of the file will automatically change when you run the application.
But you must manually change the BIOS file name for ASRock, Gigabyte, or MSI.
Modify the name of the ASRock, Gigabyte, or MSI BIOS files as follows:
- Gigabyte: gigabyte.bin.
- MSI: msi.rom.
- ASRock: creative.rom.
A warning message may pop up when you change the name. Don’t worry about that. It appears because of the change in the format. Just click Yes, and it will be gone.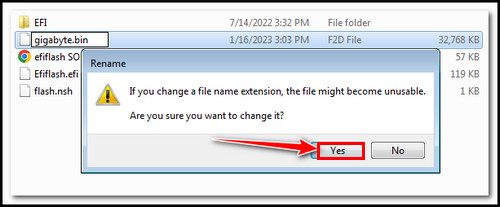
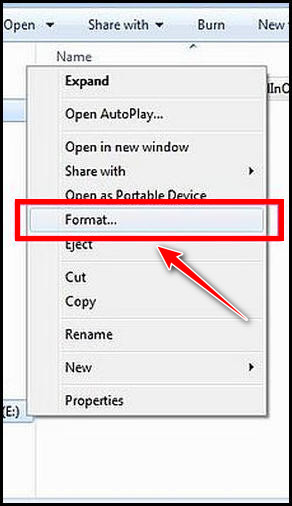
3. Format The USB Flash Drive and Copy-paste the BIOS Files
After renaming the file, you have to work with your USB drive. You have to do the process as follows.
Here are the processes to format a flash drive and move the renamed BIOS file into the USB:
- Insert your flash drive into the PC.
- Right-click on it and select Format.
- Change the File system settings to FAT32 (Default).
- Check the Quick Format option and click on Start.
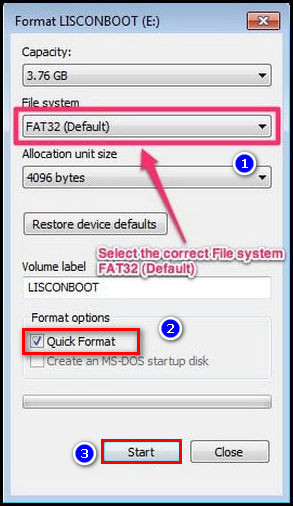
Wait a while until the process is complete. After that, copy the BIOS flash file and paste it into the USB. You don’t need to copy the entire BIOS folder. The renamed BIOS will be enough.
4. Prepare Your Motherboard
Now you have to prepare your motherboard for the BIOS update. For this, you must connect the 24-pin power connector to the motherboard. Afterward, plug in the 8-pin power connector to the CPU.
Once they are installed perfectly, connect your PC’s power supply to the power socket. Now turn on the PSU switch.
Except for the mobo & PSU, all the other components, like RAM, CPU, and GPU, should stay disconnected during the update. It won’t be a problem if they remain connected.
Now the main procedure begins. Find the BIOS USB port on the motherboard. They should be labeled as BIOS and related to it. You will also see the button right next to it. The button should be labeled as Q-Flash Plus or BIOS FLBK.
Depending on which company manufactures that motherboard, you can find this BIOS button in different locations. Most of the time, you may find it on the circuit board itself, not in the rear input-output shield.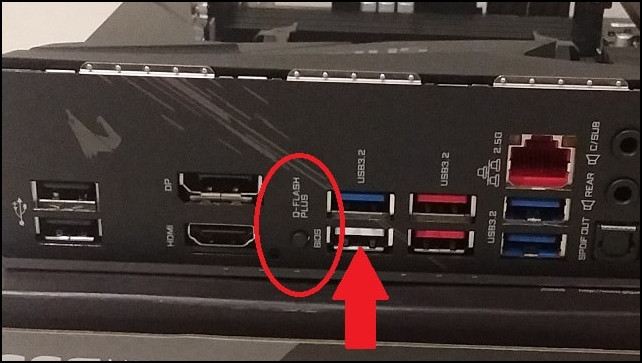
Press that button. A small LED light right next to the button will start to flash. It means the update process has begun.
Wait for a while. It can take a few minutes to finish the upgrade.
6. Remove The USB After Finishing the Update
The work is in progress if the LED continuously blinks after you press the button. It should take around 2 to 10 minutes to complete.
If the LED stops blinking right after you press the button, it indicates something is wrong. Sometimes you may have to hold down the flash button for a few seconds to start the upgrade.
If nothing works, repeat the process and check whether you miss anything or any connection is loose.
I suggest using a different flash drive this time. Format it with Rufus software, not directly from the Windows format tools, and clear your CMOS.
Once it’s done, the blinking will stop, and the PC will take an automatic restart or shut down. Remove the flash drive from the port and disconnect the PSU from the outlet.
Install all the components and start your PC. If all works fine, it means everything is in order.
Some PC users ask whether turning on a motherboard without a CPU is possible. If you are one of them, read our excellent guide: will the motherboard turn on without a CPU?
Why Should You Update a Motherboard BIOS?
When you upgrade your motherboard BIOS, the unknown bugs will be fixed, hardware compatibility issues will resolve, faulty UEFI settings will be repaired, and PC stability will improve. If the updates include security, your BIOS security will also increase.
It’s a serious issue when your new hardware isn’t compatible with the motherboard. You won’t get to take advantage of the hardware unless you upgrade your motherboard BIOS.
Bugs can affect the motherboard BIOS. Without upgrading the BIOS, there is no alternative way to remove these bugs.
Moreover, the update optimizes the mobo’s settings. That’s why the motherboard’s compatibility with other hardware is enhanced. This results in increasing overall performance. To learn more, go through our separate guide on whether a motherboard can affect PC performance.
Additionally, if your motherboard has any security vulnerability or the UEFI settings are faulty, updating the BIOS can quickly fix it.
As you can see, upgrading a motherboard BIOS is essential.
What Actions to Take and Avoid While You Update Your BIOS Without CPU?
Before the update, you must check the compatibility & update, follow the instructions, make the connections properly, provide a continuous power supply, and keep a backup. But you shouldn’t use a third-party utility, rush, interrupt, modify, or power off during the update.
Let me explain these in short detail.
Here are the things you should and shouldn’t do while you update your BIOS in the absence of the processor:
Actions to Take
First, check your motherboard compatibility from the manufacturer’s website, such as whether it has the flashback button.
Next, you have to check the current BIOS version. You can know from the System Information application.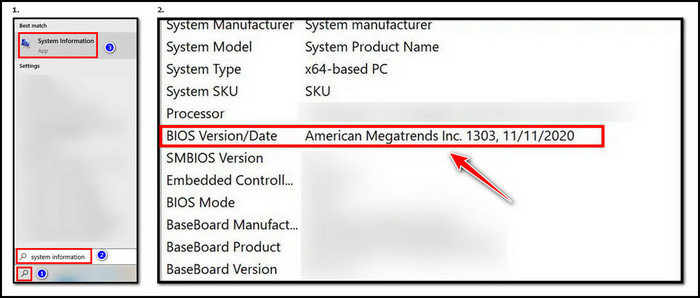
Also, look at the BIOS version you are going to download. Make sure you download the latest and update one. Don’t download the beta.
Moreover, follow the instructions properly. Make sure the connection between the motherboard and the power supply is good.
Don’t forget to keep a backup of your current BIOS settings before updating. You can go back to your previous settings if anything goes wrong.
Things You Must Avoid
You must avoid using third-party BIOS update tools the manufacturer does not support. Those tools will cause more harm than good.
It can take time to complete the update. So, don’t rush.
Also, don’t turn off the PC or cut the power while the update is ongoing. Doing so can brick your motherboard. The worst-case scenario can happen that you may not use your mobo anymore.
If the motherboard somehow gets bricked, flashing can fix it. In that case, you must know whether you can flash BIOS without a CPU.
FAQs
What happens if my BIOS is outdated?
If your BIOS is outdated, you will experience numerous issues, such as an unstable system, your PC not booting correctly, or a compatibility flaw.
Do I need to update BIOS for the old CPU?
It depends. If you are bothered by random bugs and the new BIOS contains a new security patch, you can update your BIOS. Otherwise, you don’t need it.
How do I force BIOS updates?
To force BIOS update, open the command prompt, type biosflashname.exe /forceit, and hit Enter.
Final Thought
Truth be told, it’s really irritating to update BIOS without CPU. However, you should be careful while you update. Any wrong move can put your motherboard at maximum risk.
I hope you get all the answers you need from this article. Comment below if you have any additional queries. I will gladly answer them.
Peace!