One of the positive attributes of Google’s Chromebook devices is the suite of accessibility options useful for users diagnosed with motor impairments.
The Auto Clicker feature on ChromeOS is such an option that allows users to take specific actions by simply stopping the cursor.
So, how can you enable & customize this feature on your Chromebook?
Let’s find out.
How to Automatically Click Objects on Your Chromebook
The auto clicker on Chromebook is a really cool accessibility feature as it allows us to right-click, double-click or select text without clicking the touchpad/mouse.
Since people with motor impairments can’t control their muscles and press any buttons with their fingers, they just have to drag and hover the cursor over an item/button, and it’ll be clicked automatically if the auto clicker feature is enabled.
It’s not only useful for people with disabilities, but it’s also handy for lazy people like me.
Follow our post to learn how to right-click on Chromebook.
How to Enable Auto Clicker for Chromebook
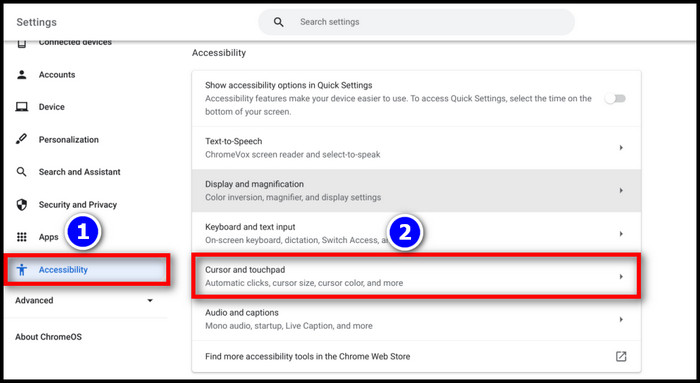
To turn on automatic clicks on your Chromebook, open Settings and select Accessibility. Then click on Cursor and touchpad(or Mouse and touchpad) and enable the toggle for Automatic clicks. You can also customize the auto-click delay and cursor area size for the auto-clicker.
Follow these steps to enable the auto clicker feature on Chromebook:
- Go to your Chromebook’s Settings.
- Navigate to Accessibility > Cursor and touchpad.
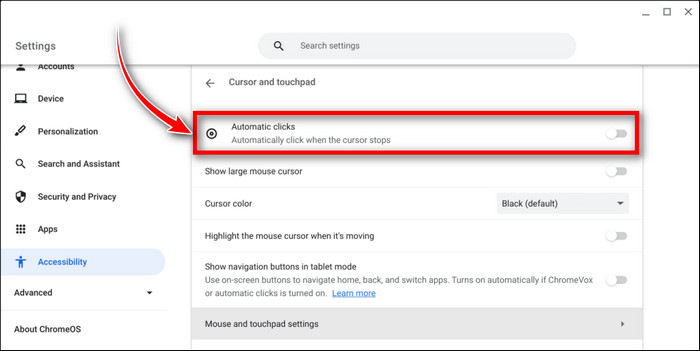
- Click on the toggle for Automatic clicks to enable the auto clicker feature.
Alternatively, you can enable the auto clicker feature from the Chrome browser as well. Simply copy-paste the following line into Chrome’s address bar and hit Enter: chrome://settings/accessibility/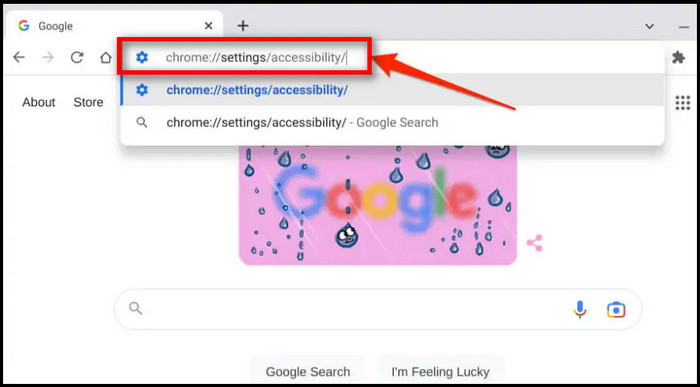
Now, click on Manage accessibility features, and it’ll take you to the Accessibility option of your Chromebook. 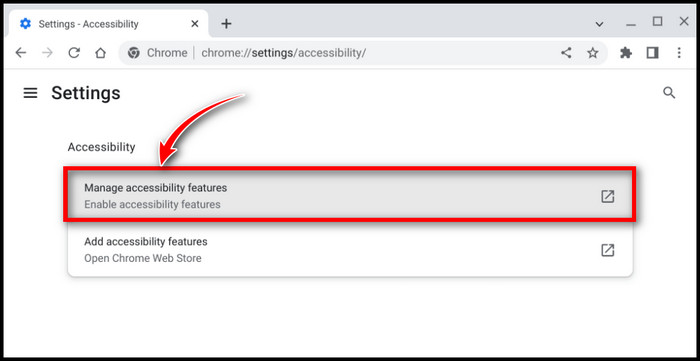 Then follow the listed steps to turn on the Automatic clicks feature.
Also, refer to the embedded article in case your Chromebook’s keyboard stops working.
Customize Auto Clicker Settings for Chromebook
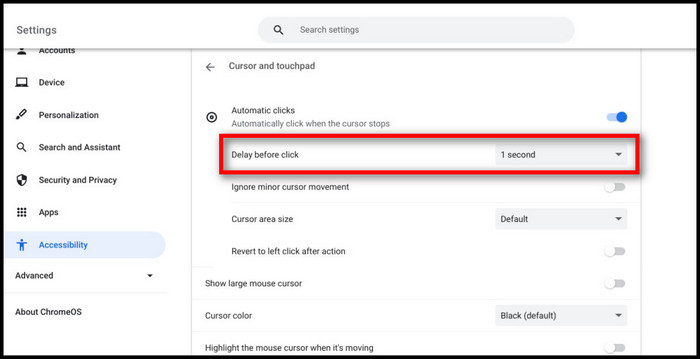
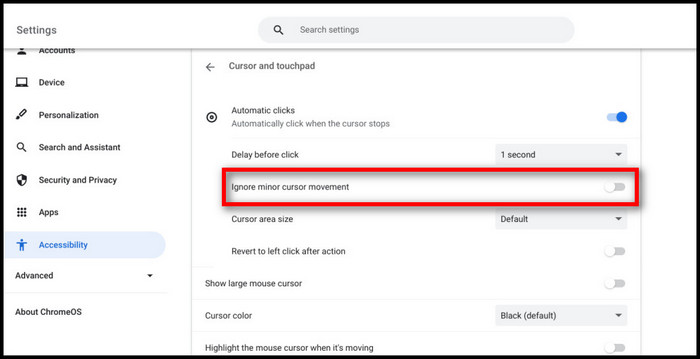
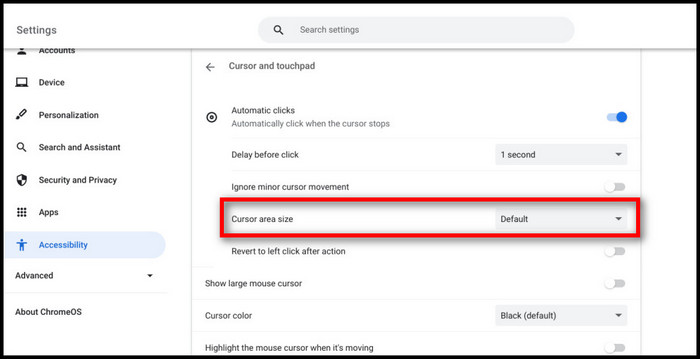
After enabling the auto clicker toggle, some additional options will appear under the Automatic clicks section. From there, you can customize certain aspects of the auto clicker feature according to your preference.
Here are some of the customization settings for Automatic clicks on Chromebook:
- Delay before click: Expand the drop-down menu for this option and choose how long your device will wait after you’ve stopped moving the cursor before performing an auto-click. I’d recommend choosing 1 second as it’s the ideal time delay for many users.
- Ignore minor cursor movement: Toggle on this option if you want to prevent the auto clicker from performing any action when you accidentally make a slight cursor/mouse movement.
- Cursor area size: This option allows users to increase/decrease the cursor ring/area size. Click on the drop-down menu next to this option and choose your preferred cursor area size.
- Revert to left-click after action: Enable this option if you want the auto clicker to revert back to left-click setting after performing each action.
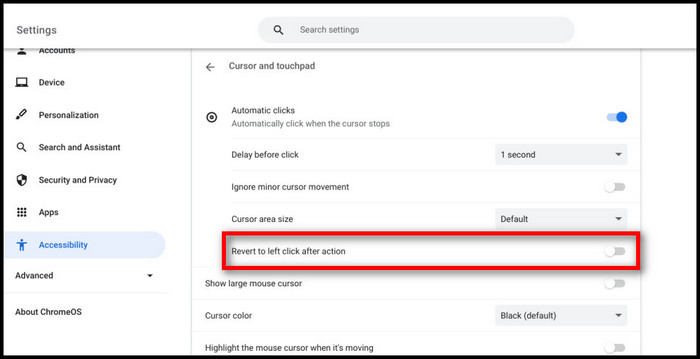
The default settings for these additional customization options are pretty solid. So you can keep these options untouched if you want.
Although it’s highly unlikely, in case something goes wrong during the setup process, you can easily reset your Chromebook.
How to Use Auto Clicker on Chromebook
After you’ve turned on the auto-clicker feature, a floating auto-clicker menu will appear at the bottom left corner of your Chromebook’s display. This menu offers certain types of clicks and actions for the auto clicker.
In simple words, you’re mapping the automatic clicking to the basic mouse functionality like right-click, double-click, scrolling, etc.
Here are the options in the floating auto-clicker menu:
- Left-click.
- Right-click.
- Double-click.
- Click and drag.
- Scroll.
- Pause/No action.
- Move the floating menu position.
To enable any of these options, just hover the cursor over any of their designated icons from the floating menu to select that specific option.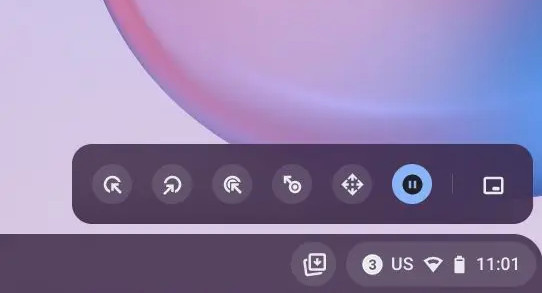
After you’ve selected the scrolling option, place the cursor on the location where you want to scroll & wait for the auto-click delay.
Then hover the cursor on the left/right/up/down arrow icons to navigate through the page. After you’re done, hover the cursor on the X icon in the middle of the pop-up nav bar to close it.
FAQs
Why is my Chromebook automatically clicking?
If your Chromebook automatically clicks, you might have accidentally enabled the Automatic clicks feature. Go to Settings > Accessibility > Cursor and touchpad, then disable the Automatic clicks option.
Is there an auto-clicker Chrome extension?
Yes. There are a few auto-clicker extensions for the Chrome browser, such as Clickin.
How to change the cursor color on Chromebook?
In case you want to change the cursor color on your Chromebook, go to Settings > Accessibility > Cursor and touchpad. From there, you’ll find the option to change the cursor color.
Conclusion
In case you’re having trouble enabling this feature, try restarting the device and updating the ChromeOS.
Anyway, that’s all for today. Hopefully, this article has helped you activate this accessibility option effortlessly. If you have any further queries on Chromebook, feel free to let us know in the comments below.
Have a good one!